Archive for the 'Cookies' Category

Sablés

Sables

These are the most addictive cookies I’ve ever eaten.  Even more so than Thin Mints.  It took a significant amount of will-power to not eat just one more.

Well, that was until we ate them all.  They only lasted two days.  There was a slight bit of miscommunication in our household involving the cookies (“Matthew ate them all!”). Angela still isn’t amused by that.

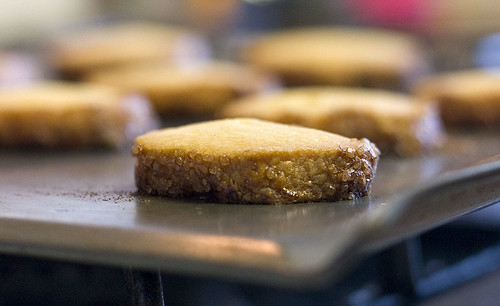
Sablés are lightly sweet with a predominant butter flavor.  In many ways, they are very French.  They’re basically the cookie form of a sweet tart dough but they also manage to be just a bit better than straight tart dough would be.  It may just be the shape (or the added sugar coating).

The problem I always have with recipes that need to be refrigerated is that when I want to make cookies, I want to make the cookies right now.  I don’t want to have to wait several hours to have the sweet ambrosia; I want it now.

It was my good fortune to actually wait and make these cookies.  The wait was definitely worth it.  We were nearly fighting over the cookies; they were that good.

Sables Before Baking

Sablés
Adapted from Baking: From My Home to Yours

2 sticks unsalted butter, softened
1/2 cup sugar
1/4 cup powdered sugar
1/2 tsp salt
3 egg yolks
2 cups all-purpose flour
coarse sugar

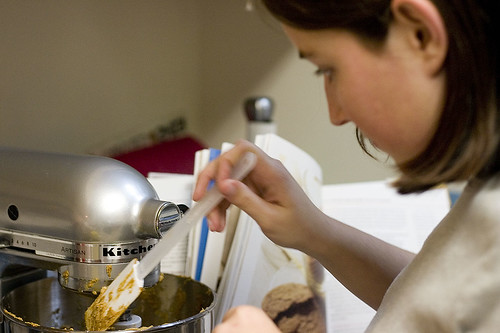
  1. In a stand mixer fitted with the paddle attachment, cream the butter at medium speed.
  2. Add the sugars and salt and beat until well blended, about 1 minute.
  3. Reduce the speed to low and beat in 2 of the egg yolks.
  4. Turn off the mixer and add the flour.  Pulse the mixer at low speed 5 times to begin to combine the flour.  Mix at low speed for about 30 seconds or until the flour is well incorporated.
  5. Remove the dough from the mixer bowl and place on a work surface.  Divide the dough in half.  Shape each half into an approximately 9-inch long smooth log and wrap it with plastic wrap.  Refrigerate for at least 3 hours, preferably overnight.
  6. Preheat the oven to 350ºF.
  7. Working with one log at a time, brush it on all sides with beaten egg yolk.  Sprinkle all over with the coarse sugar.
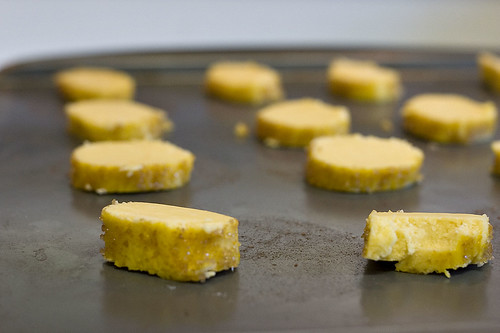
  8. Slice the log into 1/3 inch thick cookies.  Place the cookies on a baking sheet, separated by 1 inch.
  9. Bake for 17 to 20 minutes or until they are lightly browned on top.

Makes about 50 cookies.

Advertisement

Green Tree Cookies

CRW_0453


My mom always made a lot of cookies (and fudge) around Christmas time. While I liked the Russian tea cakes and chocolate chip cookies, the green tree cookies were always my favorite.

I’m not entirely sure why I liked them so much. They aren’t overly sweet. They don’t have a particularly strong flavor. It may just be that I could eat a lot of them without getting overwhelmed by them.

Whenever I have these cookies, I always think back to high school when I had lunch with a friend of mine. At the time, I wanted her to be a bit more than a friend and so, I, of course, shared some of the cookies with her. The cookies didn’t help with that situation but it wasn’t the cookies fault.

They’re still my favorite Christmas cookie. And as it was getting closer and closer to Christmas, I realized that I had to make them fast or I’d miss out this year. So I decided to whip up a batch.

It’s a pretty easy recipe. It just required me to dig out our cookie press (last used for these cookies last Christmas). And, as usual, I had trouble getting the cookies to stick to the baking sheet after pressing them. They’d much prefer to stick to the cookie press, much to my chagrin. It didn’t help that I made the mistake of greasing the cookie sheet at first (I corrected that pretty quickly).

I’m not sure the provenance of this recipe. I got my copy from my mom who has claimed that it’s a variation on a different recipe (apparently the almond extract and shape are her derivation). I did have a friend who claimed that her mom made the exact same cookie so I’m not entirely sure. I don’t know where the original recipe is from. It may have been the Betty Crocker Cooky Book.

Still, they’re quite good.

CRW_0450


Green Tree Cookies

1 cup butter, softened
1/2 cup sugar
1 egg
1 1/4 tsp almond extract
10 drops green food coloring
1/2 tsp salt
2 1/4 cup all purpose flour
extra sugar for dusting

  1. Preheat the oven to 400ºF.
  2. In an electric mixture, cream together the butter and sugar at a medium-low speed.
  3. Add the egg and mix until combined. Add the almond extract and food coloring.
  4. Add the flour and salt and mix until well combined.
  5. Place the cookie dough in a cookie press fitted with a Christmas tree die. Press cookies onto an ungreased baking sheet about 1/2″ a part.
  6. Bake until the cookies are set but not browned, about 6 to 9 minutes.
  7. Sprinkle sugar over the cookies immediately after removal from the oven.

Makes about 6 dozen cookies (depending on your cookie press).

Molasses Spice Cookies

CRW_0414


Maybe I should start with a confession: I didn’t make these. Angela did. But I helped!

I like cookies a lot. They’re probably my favorite dessert to make. I think it’s the portability of the cookie that really appeals to me. There’s no need to get out a plate or fork. You can just pick it up and eat it wherever.

And I end up eating a lot of cookies. I’ve become known for it at work. I like them to take with my lunch and I’ve been known to (frequently) eat them for breakfast. It can’t be much worse than a donut can it?

CRW_0406


We didn’t follow this recipe in all regards. It called for adding black pepper and that didn’t appeal to us (well, Angela really since she made the cookies). Supposedly it adds a spicy surprise but I wasn’t sure that pepper was a flavor I’d like in my cookies. So we omitted it and the cookies are still quite good.

Strangely, I think the cookies are better the next day than they are freshly baked (heresy I know). They firm up a bit which improves their texture. If I were to make them again, I think I would add some grated nutmeg. There’s definitely a missing flavor (which could simply be the lack of black pepper) that I think nutmeg would correct. Either way, these are still some pretty good cookies and seem appropriately Christmasy for me.

CRW_0410


Molasses Spice Cookies
Adapted from Baking: From My Home to Yours

2 1/3 cup all purpose flour
2 tsp baking soda
1/2 tsp salt
2 tsp ground ginger
1/2 tsp ground cinnamon
1/4 tsp ground allspice
12 tbsp butter, softened
1 cup light brown sugar
1/2 cup molasses
1 egg
about 1/2 cup sugar

  1. Whisk together the flour, baking soda, salt, and spices.
  2. In a stand mixer with a paddle attachment, beat the butter on medium speed until it becomes smooth and creamy.
  3. Add the brown sugar and molasses and beat to blend, about 2 minutes.
  4. Add the egg and beat for 1 minute more.
  5. Reduce the mixer speed to low and add the dry ingredients. Mix only until it is homogeneous. Turn off the mixer and verify that all the flour is mixed in by folding the mixture together several times with a spatula.
  6. Remove the cookie dough from the mixer bowl and divide it in half. Wrap each half in plastic wrap and refrigerate for 1 hour or more.
  7. Preheat the oven to 350°F. Line two cookie sheets with parchment paper.
  8. Remove the dough from the refrigerator. Divide one half into 12 different balls about 2 tbsp in size. Place each ball on a cookie sheet. Dip the bottom of a cup into sugar and press one of the balls flat, until it is 1/4″ thick. Repeat with the remaining balls and then the remaining half of the dough.
  9. Bake each cookie sheet for 12 to 14 minutes. Allow the cookies to cool and then remove them from the cookie sheet. Repeat with any remaining cookie sheets
  10. Store in a air tight container.

Makes about 24 cookies.

Sea Urchin Chocolate Cookies

CRW_9673

David Lebovitz calls these Black & White Cookies. Now, I think he’s wrong. I’m pretty sure what’s pictured on Wikipedia is not what I made (and how could Wikipedia be anything but completely correct?). He also says that they could be called earthquake cookies or chocolate tremors (because apparently the cracks look like those caused by earthquakes). Again, I’m going to have to disagree.

What do these cookies really look like? Like a sea urchin. True, it may not be the most appetizing comparison ever (all I can think of is the original Iron Chef and their usage of sea urchin roe) but, hey, it’s what they look like.

It took me awhile to figure out what they really looked like to me. I started by thinking it looked like some kind of mineral but I couldn’t find an appropriate one (trust me, there are a lot of minerals out there). Then I thought maybe it looked like a sea sponge. And then I finally settled on sea urchin.

CRW_9664

I’m a bit restricted when I make desserts as I have a certain significant other who doesn’t like nuts (or so she claims). This means that I have to adapt the desserts to remove the nuts. For things like chocolate chip cookies, that means that I just leave them out. In this case, the original recipe called for them to be ground in a food processor which made it a bit more complicated. So I just added a little bit more flour and it seemed to work out.

According to the recipe (I doubled it), this should make 80 cookies. It made much closer to 50 (I believe it was exactly 52; I don’t count, I just lay them out in orderly rows). I’m not entirely sure how one would get 80 cookies out of this batter (I really don’t think the almonds made enough of a difference but who knows). I was confused enough by it that I actually measured the size of my pre-baked cookies to make sure that they were actually an inch in diameter. I think I may need more things to do with my time.

My final comment on the cookies is that the batter really really firms up when you refrigerate it. It was almost too firm to work with (the heat in my hands did help with that). I’d also recommend that you form the cookies in an assembly line fashion. Form all the cookies first, then coat them with each sugar. I’ve actually had to take training classes in Lean+ that tell you things such as that.

CRW_9668

Sea Urchin Chocolate Cookies
Adapted from Room for Dessert

1 lb bittersweet chocolate
6 tbsp butter
3 tbsp dark rum
4 eggs, at room temperature
2/3 cup granulated sugar, plus more for rolling cookies
1 1/4 cup all purpose flour
1 tsp baking powder
powdered sugar for rolling cookies

  1. In a double broiler, melt the chocolate, butter, and rum.
  2. Combine the eggs and granulated sugar in an electric mixer on medium speed fitted with the whisk attachment. Whisk for 5 to 7 minutes or until they form a ribbon.
  3. Switch to the paddle attachment and add the flour and baking powder. Mix on low speed to combine.
  4. Refrigerate the batter until it is firm, at least 1 hour and up to several days.
  5. Preheat the oven to 325°F.
  6. Take 1 1/2 tbsp of batter and roll it between your palms to form a ball. Repeat with the remaining batter.
  7. Place the granulated sugar in one bowl and the powdered sugar in another. Roll each ball in the granulated sugar and then in the powdered sugar. Place them on a baking sheet spaced about 1″.
  8. Bake for 12 to 14 minutes. Allow to cool slightly before removing from the baking sheet. Store in a airtight container.

Makes about 50 cookies.

Madeleines

CRW_9610

I have no idea where my love of madeleines developed from. At some point in the past year, I knew that I liked them but I don’t know when I had had them. I do know that the ones usually available in the US are expensive (seriously, Trader Joe’s sells them for about $1 per cookie) and not particularly good.

This summer, I had decided that at some point in the indefinite future I was going to get madeleine pans. Whenever we’d go into a store that would sell esoteric kitchen supplies, I’d look for them and determine that I really didn’t want to buy a single use pan (Alton Brown would be upset with me now) for $12 (realizing that I’d probably need at least two to make them effectively).

CRW_9598

When my in-laws came to visit, we tend to end up at shopping locations more frequently. As I was still on my quest, I continued to look for them and mentioned to my in-laws. About a week after they had left, a package arrived in the mail for Angela and I and, lo and behold, there were two non-stick madeleine pans inside. Apparently, my mother-in-law had decided that she needed to go out and buy them for me right away. Her decision was my gain.

This isn’t the first time I’ve made madeleines but the first time I’ve used this recipe. This recipes seems to produce a better texture but the other recipe (from Susan Herrmann Loomis) seemed to make one with better flavor. I think I may combine the two at a later date. Either way, madeleines are always good.

CRW_9600

Madeleines
Adapted from Baking: From My Home to Yours

1 1/3 cup all purpose flour
1 1/2 tsp baking powder
pinch of salt
1 cup sugar
grated zest of 2 lemons
4 large eggs, at room temperature
4 tsp vanilla extract
12 tbsp melted butter, cooled

  1. Place madeleine pans in the refrigerator.
  2. Mix together the flour, salt, and baking powder in a bowl.
  3. In a mixer’s bowl, mix together the sugar and lemon zest with your finger.
  4. Add the eggs and, using the whisk attachment, mix at medium speed for 2 to 3 minutes. Add the vanilla extract and mix to combine.
  5. Fold in the flour followed by the melted butter.
  6. Remove the madeleine pans from the refrigerator and grease them. Place batter into pans, about 1 tbsp per madeleine.
  7. Refrigerate the pans and any remaining batter for at least 1 hour.
  8. Preheat the oven to 400°F.
  9. Bake the madeleines for 11 to 13 minutes. There’s no need to refrigerate any remaining batter before cooking.

Makes 24 madeleines.