Posts Tagged 'French'

Pain à l’Ancienne

Pain à l'Ancienne

We end up eating a lot of bread in our household.  And I make quite a bit of it myself.  In fact, one of the easiest ways for me to pleasantly surprise Angela is to start making bread before she gets home.  I’ve even developed a “quick” recipe for bread that I make regularly and is the metric for any bread we eat, whether I make it or it’s produced elsewhere.

This is not that bread.  The bread that I make, while quite good, does not involve any special technique.  I decided that I’d like to really take my bread making up a notch and improve both my knowledge of bread making as well as my technique.

Pain à l'Ancienne

This is my first attempt at a more advanced bread.  Actually, it’s my second attempt at this bread.  The first attempt was good but I improperly shaped it so it ended up too short.  I made this using the baker’s percentages (the recipe as written makes something like 6 baguettes which is 5 more baguettes than I would eat) which made it quite easy for me to use metric measurements.  The only hard part was measuring out 2 g of yeast.

The bread turned out quite well.  Given it’s overnight fermentation, it developed a very nice flavor.  The wetness of the dough led to a very light, airy dough; much more so than the dense bread that I normally make.

I will definitely be making this bread again whenever I have the time.  It went very well with an herb brined roast chicken and a bottle of 2007 Mandolina Rosato.

Pain à l'Ancienne

Pain à l’Ancienne
Adapted from The Bread Baker’s Apprentice: Mastering the Art of Extraordinary Bread

300 g bread flour
6 g kosher salt
2 g yeast
240 g water, ice cold

  1. In the bowl of an electric mixer, combine the flour, salt, yeast, and water.  Beat with the paddle attachment for 2 minutes on low.  Switch to the dough hook and beat for 5 minutes on medium.  Transfer to a lightly oiled bowl.  Cover and refrigerate overnight.
  2. Remove from the refrigerator and allow to rise at room temperature until it has doubled, 2 to 3 hours.
  3. Using a plastic dough scraper, transfer the dough to a well floured counter.  Shape into a bâtard.  Carefully transfer to a parchment lined baking sheet and cover until ready to bake.
  4. In the oven, place a pizza stone on the top rack and a cast iron dutch oven on the bottom rack.  Preheat the oven to 500ºF.  Bring 2 cups of water to a boil.
  5. When the oven is preheated, place the baking sheet on the pizza stone and carefully pour the boiling water into the dutch oven.
  6. Immediately reduce the temperature to 475ºF and bake for 8 to 9 minutes.  Turn the bread if it is not browning evenly.  Bake for another 10 to 15 minutes or until the bread is a rich golden brown.
  7. Remove the bread from the oven and allow to cool for at least 20 minutes before serving.

Makes 1 bâtard.

Roast Chicken

Provençal Rack of Lamb with Roasted Tomatoes

Provençal Rack of Lamb with Roasted Tomatoes

I typed up the recipe and posted the pictures to flickr a week and a half ago. Unfortunately, the real world interrupted and I never got around to writing an introduction. It appears that I’ve been a bad blog writer so my apologies. But this recipe should be worth the wait.

The best lamb I’ve ever had was Gigot D’agneau at a somewhat random bistro in Paris. The lamb was tender but flavorful. The accompanying gratin dauphinois was amazing (I had to keep close watch over it so Angela didn’t eat all of it). The ambiance was good including the French group at the next table reciting Chuck Norris facts in English (the rest of their conversation was in French). This is almost as good.

I noticed this when flipping through Gourmet and was immediately interested. Even the name makes it sound good. The in-magazine pictures didn’t hurt. We don’t usually eat rack of lamb because of the price but decided that it was worth a try.

Herb Marinade for Rack of Lamb

And it ended up being worth every penny. The lamb was tender and tasty. I’d almost recommend this as a dish to serve guests but the lamb is good that we ended up picking up individual lamb chops and biting off the bits of remaining meat. It probably is worth making a fool of one’s self for.

When making this, consider making extra potatoes (assuming they’ll fit in the pan). The potatoes are quite good and, in our household at least, extra potatoes are always well received.

This would go nicely with a nice Syrah or Shiraz (the 2001 Daniel Gehrs Shiraz we opened had gotten a little too old).

Browning Rack of Lamb

Provençal Rack of Lamb with Roasted Tomatoes
Adapted from Gourmet, October 2008

2 garlic cloves
salt and pepper
2 tsp chopped thyme
2 tsp chopped rosemary
3 tbsp olive oil, divided
2 medium tomatoes, halved
1 one lbs frenched rack of lamb
2 medium shallots, thinly sliced
2 medium boiling potatoes, peeled and sliced 1/4″ thickly
2 tbsp water

  1. Preheat the oven 400°F.
  2. Mash the garlic into a paste and add 1/2 tsp salt and 1/2 tsp pepper. Stir in the thyme and rosemary and 1 tbsp olive oil.
  3. Put the tomatoes cut side up in a small baking dish. Sprinkle 1/3 of the garlic mixture over the tomatoes. Bake the tomatoes for 30 to 40 minutes total.
  4. Meanwhile, cut the lamb rack in half and dry the lamb with paper towels and season it all over with salt and pepper.
  5. Heat 1 tbsp olive oil in an oven proof skillet over medium-high heat. Brown the lamb on all sides, about 6 minutes total. Set the lamb aside. Discard the oil.
  6. Add 1 tbsp more olive oil to skillet over medium-high heat. Add the shallots and potatoes and cook into they are just beginning to brown.
  7. Add the water and stir in 1/2 of the remaining garlic mixture to the skillet. Season the potatoes with salt and pepper. Remove from the heat.
  8. Rub the remaining garlic mixture on the fat side of the lamb racks. Place the lamb racks on top of the potatoes, fat side up. Roast in the oven until the lamb reaches an internal temperature of 135ºF about 25 minutes.
  9. Remove from the oven and allow the lamb to rest for 5 minutes.
  10. Serve with the roasted tomatoes.

Serves 2.

Gratin Dauphinois Madame Laracine (Madame Laracine’s Potato Gratin)

Gratin Dauphinois Madame Laracine

According to Patricia Wells, one can never have too many potato gratin recipes.  I agree.

It may seem as if I chronicle Angela’s dislike of foods too often on here, but I can always make her smile by welcoming her home from work or school with a potato gratin in the oven.  In fact, I don’t believe I’ve made one for someone who hasn’t fallen in love with it.

Potato gratins manage to be both decadent and homey at the same time.  While you may not have eaten them growing up (I know I certainly did not), they still manage to be comfort food.  Somehow they manage to transcend cultural boundaries.

If you’ve been paying attention, this recipe may seem similar to Gratin Dauphinois Madame Cartet (Madame Cartet’s Potato Gratin). And that would be due to the fact that they can be found in the same cookbook. In fact, they are on adjoining pages.

Why bother with different potato gratin recipes?  The obvious answer is that they’re all different.  But more precisely, they compliment other foods differently.  The gratin from Madame Cartet has dominate flavors of cheese and cream.  It is undeniably rich.  This gratin gains stronger flavors from the bay leaf and the nutmeg.  They help to reduce the richness of the gratin.  It compliments foods which are less rich.

This is a bit more complicated version of a potato gratin.  It requires the potatoes first be parboiled in milk which requires a little extra time but not that much extra work.  It mainly needs extra planning.

Gratin Dauphinois Madame Laracine

Gratin Dauphinois Madame Laracine (Madame Laracine’s Potato Gratin)
Adapted from Bistro Cooking

3 lbs. baking potatoes, peeled and thinly sliced
2 cups whole milk
3 garlic cloves, minced
3/4 tsp salt
3 bay leaves
ground nutmeg
black pepper
1 cup crème fraîche or heavy cream
2 cups grated Swiss cheese

  1. Preheat the oven to 375°F.
  2. In a large sauce pan, place the potatoes, garlic, salt, and bay leaves.  Cover with the milk and 2 cups water.  Bring to a boil over medium-high heat.  Stirring occasionally, simmer for 10 minutes over medium heat.  Remove from the heat
  3. Transfer half of the potatoes from the sauce pan to a large gratin dish.  Cover the potatoes with half the crème fraîche.  Sprinkle with half the cheese, nutmeg, and pepper.  Add the remaining potatoes then cover with the remaining crème fraîche.  Sprinkle with the remaining cheese, nutmeg, and pepper.
  4. Bake the gratin for about 1 hour, or until it is crispy and golden on top.

Serves 6 to 8.

Sablés

Sables

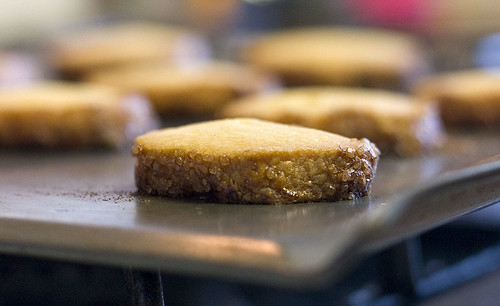
These are the most addictive cookies I’ve ever eaten.  Even more so than Thin Mints.  It took a significant amount of will-power to not eat just one more.

Well, that was until we ate them all.  They only lasted two days.  There was a slight bit of miscommunication in our household involving the cookies (“Matthew ate them all!”). Angela still isn’t amused by that.

Sablés are lightly sweet with a predominant butter flavor.  In many ways, they are very French.  They’re basically the cookie form of a sweet tart dough but they also manage to be just a bit better than straight tart dough would be.  It may just be the shape (or the added sugar coating).

The problem I always have with recipes that need to be refrigerated is that when I want to make cookies, I want to make the cookies right now.  I don’t want to have to wait several hours to have the sweet ambrosia; I want it now.

It was my good fortune to actually wait and make these cookies.  The wait was definitely worth it.  We were nearly fighting over the cookies; they were that good.

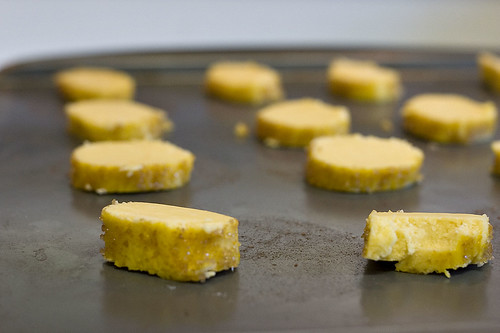
Sables Before Baking

Sablés
Adapted from Baking: From My Home to Yours

2 sticks unsalted butter, softened
1/2 cup sugar
1/4 cup powdered sugar
1/2 tsp salt
3 egg yolks
2 cups all-purpose flour
coarse sugar

  1. In a stand mixer fitted with the paddle attachment, cream the butter at medium speed.
  2. Add the sugars and salt and beat until well blended, about 1 minute.
  3. Reduce the speed to low and beat in 2 of the egg yolks.
  4. Turn off the mixer and add the flour.  Pulse the mixer at low speed 5 times to begin to combine the flour.  Mix at low speed for about 30 seconds or until the flour is well incorporated.
  5. Remove the dough from the mixer bowl and place on a work surface.  Divide the dough in half.  Shape each half into an approximately 9-inch long smooth log and wrap it with plastic wrap.  Refrigerate for at least 3 hours, preferably overnight.
  6. Preheat the oven to 350ºF.
  7. Working with one log at a time, brush it on all sides with beaten egg yolk.  Sprinkle all over with the coarse sugar.
  8. Slice the log into 1/3 inch thick cookies.  Place the cookies on a baking sheet, separated by 1 inch.
  9. Bake for 17 to 20 minutes or until they are lightly browned on top.

Makes about 50 cookies.

Le Gratin de Pommes de Terre Estival de Mireille (Mireille’s Summer Potato Gratin)

Summer Potato Gratin

I’m constantly looking for new ways to cook potatoes.  We eat a lot of potatoes (in reality, we just eat a lot of starch; we’re on an inverse Atkins diet).  My standbys are mashed potatoes or Gratin Dauphinois but I’m always on the look out for something to complement them.

Or, more simply, there are times when I don’t want something as heavy as either of those; where it’s too hot out for something that rich or just too heavy.

The only similarity this gratin shares with other gratins is that it’s cooked in a gratin dish.  It has no milk or cream.  It has no cheese.

Bacon, Onions, and Garlic Cooking for Summer Potato Gratin

It does have onions, garlic, and bacon which happen to be three of my favorite things (I won’t channel Julie Andrews for everyone’s sake).  To an extent, it vaguely reminds me of an Alsatian Tarte Flambée but with garlic and without cream.

While it’s not particular hot here in Southern California, my kitchen manages to get that way.  As does our whole apartment in the afternoon (I blame our west facing windows).  So heavy and creamy are out and light and garlicky are in.

We had this with Poulet Mistral Le Preiuré (Mistral’s Chicken with Garlic) which, ignoring the statement on that page, goes perfectly with this gratin. The garlic in both dishes compliments each other quite well.

Just make sure your date eats as much of it as you do.

Summer Potato Gratin Before Baking

Le Gratin de Pommes de Terre Estival de Mireille (Mireille’s Summer Potato Gratin)
Adapted from The Provence Cookbook

2 large onions, peeled and thinly sliced
2 tbsp olive oil
4 oz. of bacon, cut into lardons
20 cloves of garlic, peeled and cut in half
salt
2 lbs. potatoes, preferably Yukon Gold, peeled and thinly sliced
1 cup chicken stock reduced to a syrup
black pepper

  1. Preheat the oven to 375ºF.
  2. Combine the onions, olive oil, bacon, and garlic in a large skillet over medium heat.  Season to taste with salt.  Cook until the bacon and onions are lightly browned, about 5 minutes.
  3. Layer the potatoes in a gratin dish, seasoning each layer with salt.  Top with the onion and bacon mixture.  Drizzle the reduced stock over the gratin.  Season with black pepper.
  4. Bake in the oven for 1 hour to 11/2 hours, or until the potatoes are cooked through.  Regulate the heat so the onions don’t burn.
  5. Serve immediately.

Serves 6.

Navarin Printanier (Lamb Stew with Spring Vegetables)

CRW_0747


For those of you who were hoping for news of my demise, I hate to disappoint you. Instead, I spent the last 6 weeks or so working with a high school on our robot. We need to ship it last Tuesday (the 19th) and were working on it until 2:30 AM the night before. Given the amount of time and energy Angela and I put into this project (it’s all for the kids, it has nothing to do with the fact that robots are cool, really), we frequently ended up going out to eat instead of cooking. Even on the few nights that weren’t dedicated to robots (and it became fewer and fewer as time went on), we generally went out simply to save our sanity. And, for any who are curious, we compete March 21st and 22nd.

And, to make matters worse, I promptly got sick on Wednesday afternoon. Which brings us to today where, hopped up on decongestants, I was inspired to write a post because I watched Gourmet’s Diary of a Foodie about food bloggers. So that’s why you get to read my incoherent, medicated thoughts.

If you saw the entries on Cooking Lessons and thought I had been replaced (that could probably have a positive effect on the readership here), those entries are being made by my wonderful wife (I need to win some brownie points). I wish I knew how to get the author to show up by each post but I can’t figure it out without changing the theme.

Now, back to the food, I made this lamb stew almost two weeks ago apparently (I had to look at the information on the photos to figure it out). In southern California, we are currently experiencing a semi-spring. It’s still cold enough to be winter (well, as cold as it gets during winter here) but the spring vegetables are showing up at the farmer’s markets.

So, of course, I make a stew that claims to be a spring stew but leave out the green beans (they aren’t in season yet) and use frozen peas (fresh aren’t in season). I’m doing a bang up job of eating seasonally. In any case, frozen peas are almost as good as fresh ones and I’m not entirely sure green beans would’ve worked well in the stew as it turned out.

Stew also is a bit of a misnomer. When I think of stew, I think of something that is primarily liquid with good-sized chunks of meat and vegetables in it. This “stew” consists of good-sized chunks of meat and vegetables with a little bit of liquid covering them. It was good, just not very stewy.

Unfortunately, I made the mistake of cutting the lamb into slightly too small pieces. When it cooked, the lamb managed to dry out. So cut your pieces larger than I did.

The vegetables were the real stars of this dish. The root vegetables soaked up a lot of the flavors of the lamb (and stock) and were exquisite.

I should also note that the recipe for frozen peas is very good on its own. Good enough that Angela specifically asked for me to make it again (and we all know how much she loves vegetables).

CRW_0739


Navarin Printanier (Lamb Stew with Spring Vegetables)
Adapted from Mastering the Art of French Cooking

1.5 lbs. stew meat, cut into 2-inch pieces
salt and pepper
2 tbsp vegetable oil
1/2 tbsp sugar
1 1/2 tbsp flour
2 to 3 cups beef stock
2 tbsp tomato paste
a bouquet garni made up of 1 clove of garlic, 3 sprigs of thyme, and 1 bay leaf
6 peeled boiling potatoes, cut into bite sized pieces
3 peeled carrots, cut into bite sized pieces
2 peeled parsnips, cut into bite sized pieces
8 peeled white onions
1 cup prepared frozen peas

  1. Preheat the oven to 450°F.
  2. Season the lamb with salt and pepper and then dry thoroughly on paper towels. Place a skillet over high heat and add the oil. Brown the lamb a few pieces at a time in the hot oil, then transfer to a dutch oven.
  3. Sprinkle the lamb with the sugar and then place in the oven for 3 to 4 minutes or until the sugar has begun to caramelize.
  4. Toss the meat with the flour and season with salt and pepper. Place in the oven for 4 to 5 minutes, toss the meat, and then place in the oven for another 4 to 5 minutes, or until it has a light crust. Turn down the oven temperature to 350°F
  5. Pour out the fat from the skillet and add the stock. Bring the stock to a boil and deglaze the pan. Pour the stock into the dutch oven. Bring to a simmer in the dutch oven, then add the tomato paste and boquet garni. Stir to combine, return to a simmer, and then cover the dutch oven.
  6. Cook in the oven for 30 minutes to an hour depending on the size of the chunks of lamb. Remove the dutch oven from the oven. Add the potatoes, carrot, parsnips, and onions to the dutch oven and mix well. Bring to a simmer on the stove top, cover, and return to the oven for one hour more.
  7. Remove the dutch oven from the oven. Add the peas. Check the sauce for seasoning. Bring the stew to a simmer for 1 minute.
  8. Serve with good bread.

Serves 3 to 4.


Prepared Frozen Peas
Adapted from Mastering the Art of French Cooking

1 cup frozen peas
1 tbsp butter
1 tbsp diced shallots
1/4 tsp kosher salt
pinch of pepper
1/4 cup beef stock

  1. Bring the butter, shallots, salt, pepper, and beef stock to a boil in a small saucepan. Add the peas, cover, and simmer for 5 to 6 minutes, or until the peas are tender.
  2. Remove the lid and boil off any remaining liquid.

Makes 1 cup of peas.

Suprêmes de Volaille aux Champignons (Chicken Breasts with Mushrooms and Cream)

CRW_0659

Ever have a dinner that is surprisingly good? This was one of them. I never have high hopes for anything based around a chicken breast. They’re frequently dry and tasteless. And, while I haven’t tried it, I’m sure that brining helps (yet another thing on my cooking to do list). But, when you get down to it, chicken breasts aren’t particularly exciting. In many ways, they’re the tofu of the meat eating world except they don’t readily take on other flavors as well.

Except, when I made Suprêmes de Volaille aux Champignons (I’ve been avoiding using the proper name as it’s a bit incongruous in a sentence), it was surprisingly good. It wasn’t a burst of flavor in your mouth but it was simple and it was good. The chicken wasn’t dry and had some good flavor but the sauce was very creamy and chickeny. It may not be something to serve to guests but it’s good for a weeknight meal.

CRW_0654

I was particularly fond of the mushrooms (Angela doesn’t like them; and she also complains that I only say she doesn’t like things; she did like the chicken, so there). If you look at the pictures, you’ll think I had only a few but I didn’t ladle the rest of them out of the skillet until after taking the pictures. By the time I was finished, there were more mushrooms than chicken.

I should say, however, if you prepare this recipe realize that I did use a smaller chicken that I got from the farmer’s market. The breasts themselves were pretty small, probably only several ounces each; so the times may be different if you use a larger chicken breast. I’d suggest cooking to temperature instead of time.

I’m a bit surprised by this recipe as it doesn’t involving browning the chicken. Normally, browning meat is important for the development of flavor but not in this recipe. And I can’t say I missed it. Given that the chicken breast is small, a greater proportion of the flavor comes from the sauce and from the chicken stock in the sauce.

Serve with Gratin Dauphinois Madame Cartet (Madame Cartet’s Potato Gratin).

CRW_0656

Suprêmes de Volaille aux Champignons (Chicken Breasts with Mushrooms and Cream)
Adapted from Mastering the Art of French Cooking

2 boneless, skinless chicken breasts
1/2 tsp lemon juice
salt
3 tbsp butter
1 tbsp minced shallots
1/4 lbs. mushrooms, cleaned and quartered
2 tbsp chicken stock
2 tbsp white vermouth
1/2 cup heavy cream
1 tbsp parsley

  1. Preheat the oven to 375ºF.
  2. Rub the chicken breasts with a small amount of the lemon juice and season with salt. Set aside.
  3. In a large skillet, heat the butter over medium heat until it is foaming. Add the shallots and sauté for 1 minute. Add the mushrooms and sauté for 2 minutes more. Season with salt.
  4. Add the chicken breasts to the skillet and roll them in the butter. Cover the skillet and place it in the oven. Cook for about 7 minutes or until the chicken breasts reach an internal temperature of 165ºF.
  5. Remove the skillet from the oven and remove the chicken breasts from the skillet. Add the stock and vermouth to the skillet and bring to a boil over high heat. Boil until the liquid is syrupy.
  6. Add the cream and reduce heat to a simmer. Simmer until the cream is thickened. Remove from the heat.
  7. Season with salt and lemon juice as needed. Stir in the parsley.
  8. Serve the chicken covered with the sauce and mushrooms.

Serves 2.

Tartlette aux Framboise (Raspberry Tart)

CRW_0531


Growing up, my parents had a raspberry bush in the back yard. I used to love going down to eat them right off the bush. I even picked them and sold them in a mini-road side farm stand. It was all on the honor system and no one took advantage of me. Someone did eventually steal the Fisher Price picnic table that I used for displaying the produce but they may have assumed it was sitting out for the trash. Unfortunately, the raspberry bush is no longer there (it reached it’s fruit producing lifespan and my parents opted to not replace it) but my love of raspberries is.

On my first visit to France, there was a small bakery across the street from our hotel. The first couple days I partook of the hotel’s continental breakfast but was not particularly impressed. I went to the bakery for breakfast instead and settled on the raspberry tart. My French is practically non-existent but by a combination of half remembering framboise and pointing I was able to get what I wanted.

It may be the haziness of memory, but it was good. Really good. I did a little more traveling in France and couldn’t find anything similar. I’ve looked elsewhere and never found something quite as good. I found a raspberry tart in San Francisco but it used a lemon curd base which wasn’t what I was looking for.

CRW_0526


A while ago, I had decided that I would make myself a raspberry tart. I may not be a pastry chef (I don’t have the patience for that) but what better way to make something that you like? Aside from inertia, the main reason I had never attempted to make one before was simply that raspberries were expensive and I didn’t want to waste them by making a bad tart.

The other day, I was walking by Farm Boy and noticed they were advertising a half-pint of raspberries for $1.00. That was too good of a deal to pass up (regardless of the unknown provenance of the raspberries).

I really haven’t made any tarts before so it was an issue of figuring exactly what to use in making it. A tart consists of the tart shell, the cream used in the shell, and then the topping. I settled on pâte sablée and creme pâstissière because they seemed closest to what I’d had in the past and they both seemed fairly simple and classic. I’m not entirely sure it was the right choice.

The tart was good. Quite good. But the creme pâstissière seemed to overpower the raspberries a bit. The pâte sablée also didn’t have great structural integrity so the creme pâstissière started spilling out and making a mess. I ended up having to eat it with a fork.

This recipe may need a bit more work but it’s still good. It isn’t overly sweet. It would make a good afternoon snack.

CRW_0527


Tartlette aux Framboise (Raspberry Tart)

Pâte Sablée
Crème Pâstissière
1 cup raspberries

  1. Pat the dough into 3 four inch mini tart pans. Refrigerate the dough for 30 minutes.
  2. Preheat the oven to 425°F.
  3. Place a layer of aluminum foil over the tart pans. Place pastry weights on top of the aluminum foil.
  4. Place the tart pans on a baking tray and bake in the middle of the preheated oven for 20 minutes.
  5. Remove the tart pans from the oven, remove the pastry weights and aluminum foil, and return to the oven. Bake for 7 more minutes.
  6. Remove the tart pans from the oven and allow to cool completely. Remove the tart dough from the tart pan.
  7. Rinse and dry the raspberries.
  8. Place a layer of crème pâstissière in each tart. Cover with the raspberries.
  9. Chill completely and serve.

Makes 3 mini-tarts.


Pâte Sablée (Shortbread Dough)
Adapted from The Roux Brothers on Patisserie

250 g flour
200 g cold butter (about 7 tbsp), diced
100 g powdered sugar
pinch of salt
2 egg yolks

  1. Sift the flour onto a work surface and make a well in the center.
  2. Place the butter in the well and work with your fingers until it is very soft.
  3. Add the powdered sugar and the salt to the butter and cream them together with your fingers.
  4. Add the egg yolk to the well and mix well.
  5. Slowly incorporate the flour into the butter mixture. Mix until it is just homogeneous.


Crème Pâstissière (Pastry Cream)
Adapted from The Roux Brothers on Patisserie

6 egg yolks
125 g sugar
40 g flour
500 ml milk
1/2 tsp vanilla extract

  1. Place the egg yolks and 1/3 of the sugar in a bowl. Whisk together until pale ribbons are formed. Whisk in the flour.
  2. In a sauce pan, combine the flour, remaining sugar, and vanilla extract. Heat over high heat.
  3. When the mixture begins to bubble, remove from the heat. Temper 1/3 of the milk mixture into the bowl with the eggs, stirring constantly. Pour the milk and the eggs back into the sauce pan, stirring constantly.
  4. Heat over medium low heat, stirring constantly, until the mixture thickens.
  5. Remove from the heat and allow to cool completely.

Normandy Apple Tart

CRW_0318


This was actually made over a week ago. I had queued up a couple recipes as we last Friday we headed to the airport to fly to visit Angela’s parent’s for Christmas. We made it to the airport with plenty of time to spare. Our flight took off on time and it looked like our trip would be uneventful.

And then we arrived over Milwaukee. And entered a holding pattern. We circled for about an hour until we were told we were running out of fuel and had to divert to Madison. Flaps were out, landing gear was down, and we were approaching the run way. I could just see the landing lights through the fog and then the pilot gunned the engines and pulled up. Turned out we had to abort the landing as air traffic control wasn’t sure whether or not there was another plane on the runway. We were able to turn around and land successfully.

CRW_0303


And then we had to wait to get our luggage. And then take a bus to Milwaukee where we found out we could get a flight out the next day. The airline was nice enough to give us a hotel to stay in (of course, they gave us the wrong name of the hotel first and once we got the correct name gave us incorrect information as to how to contact them).

The next day was as fogging as the last. And pretty quickly our flight was canceled. We rebooked for the next day and went to another hotel.

So, after two days, the fog cleared and we showed up at the airport again, a bit hopeful, a bit apprehensive. At first, our flight was going to be delayed. And then it was on time again. When we saw the plane at the gate, Angela did a happy dance. And when, sitting at the end of the runway, the pilot revved the engine and we started accelerating, I had one of the biggest smiles on my face ever (not quite as big as my wedding day).

And I’ve never been happier to be in Florida.

Of course, this has nothing to do with the apple tart. I like apple tart’s quite a bit and am always looking for new ones to try. For some reason, I tend to like them better than apple pie. It may not be very American of me but it’s true (call homeland security!).

This apple tart is mostly apple sauce in a tart shell covered with sliced apples. It’s very simple. It doesn’t even use cinnamon. It’s apples at their simplest.

When I made it, the green apples we had were extremely tart. So tart that I felt the need to sprinkle sugar on top of the tart even though the original recipe didn’t call for it. And it was still tart. So be aware.

CRW_0316


Normandy Apple Tart
Adapted from Baking: From My Home to Yours

1 9-inch partially-baked sweet tart shell

For the applesauce:
2 lbs. red apples
1/4 cup water
1 tbsp light brown sugar
1-4 tbsp sugar (optional)

For the topping:
2 medium green apples
egg wash of 1 egg beaten with 1/2 tsp water
2 tbsp sugar

  1. Cut the apples into chunks and place in a large saucepan. Mix in the water and brown sugar. Cover and heat over medium-low heat. Cook at just below a simmer until the apples are soft, about 15 to 20 minutes.
  2. Remove the pan from the heat and run the apples through a food mill fitted with a disc with the largest holes. Taste the sauce and add sugar if necessary. Allow to cool to room temperature. The sauce may be refrigerated for several days.
  3. Preheat the oven to 400ºF.
  4. Fill the tart shell almost to the rim with the apple sauce.
  5. Peel and core the green apples. Slice them thinly. Arrange the apple slices in a spiral pattern on top of the apple sauce. Rub the cut apples with the egg wash and sprinkle with the sugar.
  6. Bake the tart for 45 to 50 minutes.
  7. Serve warm or at room temperature.

Serves 8.


Partially-Baked Sweet Tart Shell
Adapted from Baking: From My Home to Yours

1 1/2 cups all purpose flour
1/2 cup confectioners’ sugar
1/4 tsp salt
9 tbsp cold butter, cut into 1 tbsp chunks
1 egg yolk

  1. Place the flour, sugar, and salt in the bowl of an electric mixer fitted with the paddle attachment. Mix briefly, until the ingredients are well combined.
  2. With the mixer at low speed, add the butter 1 tbsp at a time. When the butter is fully added, increase the speed to medium, until the butter and flour mixture forms pea sized granules.
  3. Reduce the speed to low and add the egg yolk. Increase the speed to medium and mix until the dough is slightly sticky.
  4. Remove the dough from the mixer bowl and press it into a fluted 9-inch tart pan.
  5. Put the tart pan in the freezer and freeze for at least 30 minutes.
  6. Preheat the oven to 375ºF.
  7. Press a greased sheet of aluminum foil onto the tart dough. Bake for 25 minutes.
  8. Remove from the oven and remove the aluminum foil. Press down any places the dough has puffed. Allow to cool before using.

Poulet Sauté aux Herbes (Sautéed Chicken with Herbs)

CRW_0332


Julia Child said that in France the chicken tasted more chickeny. I like to think that she was talking about this dish.

The problem with a lot of chicken dishes is that they really don’t taste like much. How many times have I had a grilled chicken breast or chicken caesar salad that didn’t really taste like much of anything? And yet chicken is the most popular form of protein in the United States.

When I first made this recipe, it was refreshing to find a chicken recipe that actually tasted like, you know, chicken. It quickly became one of my wife’s favorite meals.

CRW_0324

And, it’s not only good, it’s also pretty easy. It takes about 45 minutes including preparation time. It’s even faster if you quarter the chicken the night before (or as soon as you get it home from the store). It’s easiest enough for a weeknight but tastes good enough for a special occasion. I’ve even made it when visiting family on the other side of the country.

The dish is decent with a mass produced whole chicken but even better with an all-natural or organic bird. This is the dish that made me switch my change my chicken buying habits.

When I quarter my chicken, I don’t use the wings (we never eat them). I also bone and skin the chicken breasts (Angela prefers them that way). If the breast halves are large, I cut them in half again. I usually save the chicken carcass for making stock later on.

The pan sauce made is really for topping the chicken. In our household, we usually dip bread into it. Usually I serve this with a potato gratin and green beans or peas. A light white wine also goes well. Last night, we had a Lucas & Lewellen Chardonnay (it wasn’t overly oaked or buttery so it worked well with this dish).

CRW_0327
Poulet Sauté aux Herbes (Sautéed Chicken with Herbs)
Adapted from Mastering the Art of French Cooking

1 3-4 lbs. chicken, quartered
salt
4 tbsp butter
1 tbsp vegetable oil
1 tsp dried thyme
1 tsp dried tarragon
1 tsp dried basil
pepper
1 tbsp shallots, minced
1 cup chicken stock

  1. Preferably the night before, salt the chicken on both sides and refrigerate until the next day (if not salting the night before, salt immediately before cooking).
  2. Dry the chicken with paper towels thoroughly. Heat 2 tbsp butter and 1 tbsp vegetable oil in a large skillet over medium-high heat. Brown the chicken in the skillet on both sides, in batches if necessary. Remove the chicken to a plate and reduce the heat to medium.
  3. Sprinkle the herbs on each side of the chicken. Season the chicken with pepper.
  4. Add the dark meat (thigh and leg) pieces back into the skillet and cover. Cook over medium heat for 8 minutes.
  5. Turn the dark meat chicken and add the remaining chicken to the skillet. Cover and cook for 15 minutes, turning once.
  6. Remove the chicken from the skillet and cover with aluminum foil. Add the shallots to the skillet and cook until softened, about 1 minute.
  7. Add the chicken stock and increase the heat to high. Boil the sauce until its slightly reduced, about 3 to 5 minutes. Remove from heat. Stir in the remaining butter.
  8. Serve the chicken with the pan sauce.

Serves 4 to 5.


Flickr Photos