Archive Page 5

Spicy Beef with Vegetables

Spicy Beef with Vegetables Cooking

Just in time for the Beijing Olympics (I’m actually watching the women’s gymnastics competition while writing this), here is a Chinese beef recipe.  Of course, I made this with no regards to the Olympics whatsoever last week.  I did, however, wonder how many people ordered Chinese takeout to watch the opening ceremonies on Friday.

Part of the reason I decided to make this recipe was that I had finally tracked down mo-er mushrooms at 99 Ranch Market the last time I was there. I wasn’t entirely sure I had purchased the correct thing until I compared the glossary in the cookbook to the mushroom packaging and could match up two of the three Chinese characters (there were two listed in the cookbook, there were three on the packaging). I took a picture of them to help you find them.

Mo-er Mushrooms

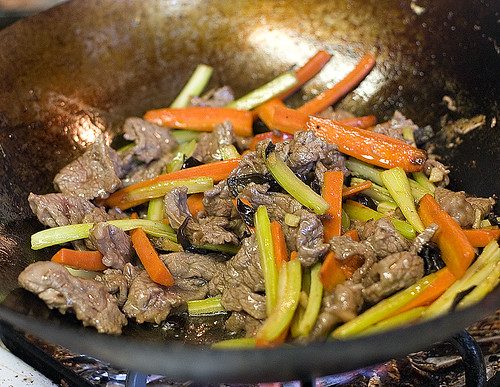
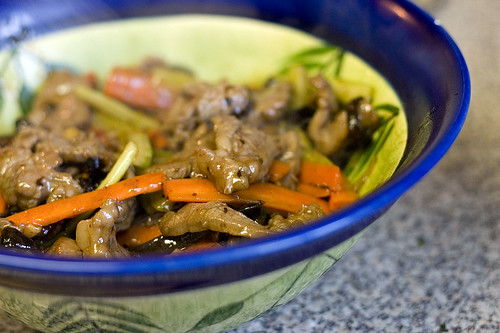
This is prepared in a very similar fashion to Chili-Pepper Beef but the flavor is quite a bit different. The Spicy Beef, oddly enough, isn’t as spicy as the Chili-Pepper Beef. However, the vegetables work much better in the Spicy Beef. In some ways, I prefer the Chili-Pepper Beef but this is also good, in a different way.

Spicy Beef with Vegetables

Spicy Beef with Vegetables
Adapted from The Key to Chinese Cooking

1/2 lbs. flank steak, shredded
1 tbsp dried mo-er mushrooms
1 1/2 cups shredded celery
1 cup shredded carrots
1 garlic clove, minced
2 quarter-sized slices peeled ginger, minced
1/2 tsp salt

Marinade:
1 tsp light soy sauce
2 tsp cornstarch dissolved in 1 tbsp water
1 tsp oil

Sauce:
1 tbsp black bean paste
1 tsp chili sauce
1 tsp light soy sauce
1 tbsp Shaoxing wine
1 1/2 tsp Chenkong vinegar
1/4 tsp salt
1 tsp sugar
1 tsp cornstarch dissolved in 2 tsp water
2 tsp seasame oil

  1. Combine the marinade ingredients and toss with the steak.  Allow the meat to sit, refrigerated, for 30 minutes or more.
  2. Soak the mo-er mushrooms for 30 minutes in warm water.  Rinse and discard the hard “eyes.”  Then, shred them.
  3. Heat a wok over high heat until very hot.  Add 1 cup of oil.  When the oil is 375ºF, add the beef and toss rapidly for 10 seconds.  Remove from the heat and pour the meat and oil into a strainer over a bowl.  Allow the oil to drain off the meat.
  4. Return 3 tbsp oil to the pan and heat over high heat until hot.  Add the garlic and ginger, stir a few times, then immediately add the celery, carrots, and mushrooms.  Cook, stirring regularly, until the vegetables are softened, several minutes.
  5. Add the beef and cook for 1 minute more, stirring regularly.
  6. Add the sauce, stirring to combine, and cook for 5 to 10 seconds.
  7. Serve immediately with white rice.

Serves 2.

Bucatini with Sausage and Peas

Bucattini with Sausage and Peas

If you haven’t been paying attention, I tend to post a lot of pasta recipes. Here’s one more to enhance my collection.

This recipe actually comes from Sting’s personal chef (or so it was stated in Food & Wine).  Appropriately, when I started to make this and turned on the radio, a Police song came on.  I considered that a good omen.

There’s nothing complicated or special about this recipe.  It is simple but in its simplicity there is taste and quality.  It is a pasta should be.

The dominant flavor in the pasta is the sausage; the sausage ends up providing most of the seasoning to the sauce.  The tomato sauce and the peas merely compliment the sausage.  There’s no need to use actual bucatini; any spagheti-like pasta will do.

When I made this, Angela was out of town.  I made a full recipe any way and ate it for the next two days for lunch. It reheated well and made a good lunch (as long as I remember to bring along some cookies for dessert).

Parcooking Tomatoes

Bucatini with Sausage and Peas
Adapted from Food and Wine September 2007

2 tbsp olive oil
1/2 lbs. Italian sausage, casings removed
2 garlic cloves, minced
1 small shallot, minced
2 1/2 cups tomato purée
1/4 cup heavy cream
1/2 cup frozen baby peas
salt
1 lbs. bucatini or spaghetti
1/2 cup grated parmesan cheese

  1. In a large saucepan, heat the olive oil over medium high heat. When the olive oil is hot, add the sausage, breaking it up with a spoon, until the sausage is well browned, about 8 minutes.
  2. Pour out the excess oil and discard. Add the garlic and shallots and cook until softened, about 2 minutes.
  3. Add the tomato sauce and bring to a simmer. Cook, partially covered, at a low simmer for 30 minutes.
  4. Stir in the peas and heavy cream and simmer for 10 more minutes. Add half the parmesan cheese and season to taste with salt.
  5. While the sauce is cooking, cook the bucattini in boiling salted water for 1 minute less than the manufacturer recommends.
  6. Add the pasta to the sauce and cook at a simmer for 1 minute more.
  7. Serve immediately topped with the remaining parmesan cheese.

Serves 4 to 6.

Watermelon Sorbetto

Watermelon Sorbetto

With the coming of summer, I’ve been tempted by all the various melons at the farmer’s market. It’s hard for me to resist those juicy orbs.

Unfortunately, I have the distinct tendency to bring a newly purchased melon home, put it in the refrigerator, and then promptly forget to eat it. Normally, discovering that I had some form of melon that I didn’t know I had (well, not too long after I bought it), isn’t a bad thing but I still have to figure out what to do with it.

I usually intend to chop it up and take it with me to work for breakfast. My problem is that at night, I’ll tell myself I’ll cut it up in the morning. And in the morning, I don’t feel like cutting it up in my half-awake state and that I’ll cut it up that night for the next day. Rinse, repeat, ad nauseum, and I wind up with the forgotten melon.

I finally had enough of the watermelon accusingly staring me in the face every time I opened the refrigerator and decided to do something about it. Hence, watermelon sorbetto.

This isn’t actually the first time I made a watermelon sorbet. I tried one sometime last year (I don’t remember what recipe I used) but I don’t remember being impressed by it. I think it might have been a texture issue. I find that texture is very important in frozen desserts so I made sure to strain the watermelon purée which made for a very smooth sorbet.

The sorbet ended up tasting more like watermelon than eating the watermelon straight did (which was good as I realized the watermelon was much closer to tasteless than I like). The mini-chocolate chips add a nice contrast to the sorbet as well as looking like seeds. Be aware that the sorbet freezes very hard and needs to be allowed to soften for several minutes before eating (or you may break your spoon).

Watermelon

Watermelon Sorbetto
Adapted from Perfect Scoop: Ice Creams, Sorbets, Granitas, and Sweet Accompaniments

3 lbs. watermelon, seeded and cubed
1/2 cup sugar
pinch of salt
1 tbsp lime juice
2 tbsp vodka
2 tbsp mini chocolate chips

  1. Purée the watermelon in a food processor or blender. Run the watermelon purée through a fine mesh strainer. Measure out 3 cups of watermelon juice.
  2. In a small saucepan, heat approximately 1/2 cup of the watermelon juice along with the sugar and salt until the sugar has thoroughly dissolved. Remove from the heat.
  3. Combine the watermelon juice in the saucepan with the other watermelon juice and place in a medium sized bowl. Stir in the lime juice and vodka.
  4. Chill the mixture thoroughly in the refrigerator.
  5. Freeze in an ice cream maker according to the manufacturer’s directions. During the last minute of freezing, pour in the chocolate chips.
  6. Remove from the ice cream maker’s bowl and place in a container. Place the container in the freezer to finish freezing.
  7. Several minutes before eating, remove from the freezer.

Makes about 1 quart

Tacos de Camarones al Mojo de Ajo (Shrimp Tacos)

Shrimp Tacos

This recipe comes as a bit of a request. I felt a bit strange making it as we have a good and cheap taqueria nearby but at least they don’t serve shrimp tacos.  I did have some mediocre shrimp tacos the other day so I really wasn’t expecting much from this recipe.

And how wrong I was.  This may have been the best shrimp I’ve ever had (I’m debating whether or not it’s better than Gamberi alla Cannavota).  The shrimp were well browned and took on the flavorings of the aromatics perfectly.

Cooking Shrimp for Tacos

I’m going to segue here a bit and do a product anti-endorsement: whatever you do, don’t buy Whole Food’s Organic Corn Tortillas.  We tried to use them to make tacos and they were nearly inedible.  They were some of the worst corn tortillas I’ve ever eaten.

On the plus side, the shrimp were good enough to eat without a tortilla wrapper.  In fact, the shrimp in this recipe would be good enough served over rice of some sort.

The only modification to the recipe I made was to add a step to brine the shrimp.  It means that it takes slightly longer for the whole recipe (which is already very short) but it really helps with the flavor and texture of the shrimp.

This has to be one of the best bang-for-your effort recipes I’ve seen in awhile.  The shrimp are excellent and there’s very little work needed to make this.  It’s also rather fast.  It does create a bit of smoke however.

Ingedients for Shrimp Tacos

Tacos de Camarones al Mojo de Ajo (Shrimp Tacos)
Adapted from Dona Tomas: Discovering Authentic Mexican Cooking

1/2 cup kosher salt
1/2 cup sugar
2 cups water
4 cups ice
1 1/2 lbs. medium shrimp, peeled, deveined, and split lengthwise
1/4 cup vegetable oil
1 onion, sliced
1 jalapeño, sliced thinly
2 tbsp chopped garlic
1/4 cup chopped Italian parsley
16 corn tortillas
1 lime (for serving)

  1. Bring the water, salt, and sugar to a boil over high heat.  Remove from the heat and pour into a bowl.   Add the ice.
  2. When the ice has melted, add the shrimp and brine for 15 minutes.  After 15 minutes, remove the shrimp from the bowl and dry thoroughly with paper towels.
  3. Heat a large sauté pan over high heat.  When the pan is hot, add the oil and the onions.  Stir the onions several times, then add the shrimp.
  4. Cook the shrimp for 1 to 1 1/2 minutes or until they start to turn red.
  5. Add the butter, jalapeño, and garlic and cook for 1 minute more.
  6. Remove from the heat.  Adjust the seasoning to taste and stir in the parsley.
  7. Place the tortillas in stacks of two on plates.  Divide the shrimp among the tortillas.
  8. Serve immediately.

Serves 4.

Caramel Ice Cream

Caramel Ice Cream

As long as I’ve known her, Angela has appreciated anything and everything caramel. Given I’ve found it’s in my best interest to keep her happy, I decided to make her some caramel ice cream.

I almost didn’t post this recipe because it didn’t work for me as written.  The original recipe had you add the heavy cream to the caramel and that was it.  Unfortunately, when I was making this, the caramel solidified in the presence of the heavy cream.  Luckily, I realized it would melt again if the heavy cream was heated but I did have to blaze my own trail through the recipe.

Sugar Ready to be Caramelized

I have to admit, however, that it may have been might fault. Given Angela’s preferences, I didn’t caramelize the sugar heavily. I think that the sugar simply wasn’t hot enough in comparison to the heavy cream. So, you may not have my issues and the caramel may stay liquid after you add the heavy cream.

Despite my difficulties, this was definitely worth it.  Homemade ice cream always has a taste premium over store bought but I think that caramel emphasizes that difference.  It was very rich but very good.

Caramelizing Sugar for Ice Cream

Caramel Ice Cream
Adapted from Room For Dessert : 110 Recipes for Cakes, Custards, Souffles, Tarts, Pies, Cobblers, Sorbets, Sherbets, Ice Creams, Cookies, Candies, and Cordials

1 1/2 cups sugar
1 vanilla bean, split
2 cups heavy cream
1 1/2 cups half-and-half
1/4 tsp salt
6 egg yolks

  1. Sprinkle the sugar evenly on the bottom of a heavy sauce pan (perferably non-stick).  Add the vanilla bean.  Place over medium heat and cook until the sugar caramelizes and begins to smoke, stirring occassionally.
  2. Carefully add the heavy cream (it may boil violently).  If the caramel is not dissolved in the heavy cream, heat the heavy cream over medium heat stirring regularly, until the caramel has dissolved.
  3. Whisk in the half-and-half and the salt.
  4. Place the egg yolks in a bowl and whisk together.  Slowly whisk in 1/4 of the heavy cream mixture into the egg yolks.  Return the egg yolks and heavy cream to the pan.
  5. Cook over medium-low heat until the mixture has thickened enough to coat the back of a spoon.  Remove from the heat.
  6. Pour the mixture through a fine sieve into a bowl.  Allow to cool to room temperature, then chill in the refrigerator until cold.
  7. Freeze in an ice cream maker according to the manufacturer’s instructions then place in the freezer to complete the freezing process.

Makes about 1 quart.

Le Gratin de Pommes de Terre Estival de Mireille (Mireille’s Summer Potato Gratin)

Summer Potato Gratin

I’m constantly looking for new ways to cook potatoes.  We eat a lot of potatoes (in reality, we just eat a lot of starch; we’re on an inverse Atkins diet).  My standbys are mashed potatoes or Gratin Dauphinois but I’m always on the look out for something to complement them.

Or, more simply, there are times when I don’t want something as heavy as either of those; where it’s too hot out for something that rich or just too heavy.

The only similarity this gratin shares with other gratins is that it’s cooked in a gratin dish.  It has no milk or cream.  It has no cheese.

Bacon, Onions, and Garlic Cooking for Summer Potato Gratin

It does have onions, garlic, and bacon which happen to be three of my favorite things (I won’t channel Julie Andrews for everyone’s sake).  To an extent, it vaguely reminds me of an Alsatian Tarte Flambée but with garlic and without cream.

While it’s not particular hot here in Southern California, my kitchen manages to get that way.  As does our whole apartment in the afternoon (I blame our west facing windows).  So heavy and creamy are out and light and garlicky are in.

We had this with Poulet Mistral Le Preiuré (Mistral’s Chicken with Garlic) which, ignoring the statement on that page, goes perfectly with this gratin. The garlic in both dishes compliments each other quite well.

Just make sure your date eats as much of it as you do.

Summer Potato Gratin Before Baking

Le Gratin de Pommes de Terre Estival de Mireille (Mireille’s Summer Potato Gratin)
Adapted from The Provence Cookbook

2 large onions, peeled and thinly sliced
2 tbsp olive oil
4 oz. of bacon, cut into lardons
20 cloves of garlic, peeled and cut in half
salt
2 lbs. potatoes, preferably Yukon Gold, peeled and thinly sliced
1 cup chicken stock reduced to a syrup
black pepper

  1. Preheat the oven to 375ºF.
  2. Combine the onions, olive oil, bacon, and garlic in a large skillet over medium heat.  Season to taste with salt.  Cook until the bacon and onions are lightly browned, about 5 minutes.
  3. Layer the potatoes in a gratin dish, seasoning each layer with salt.  Top with the onion and bacon mixture.  Drizzle the reduced stock over the gratin.  Season with black pepper.
  4. Bake in the oven for 1 hour to 11/2 hours, or until the potatoes are cooked through.  Regulate the heat so the onions don’t burn.
  5. Serve immediately.

Serves 6.

Lemon-Herb Chicken

Lemon-Herb Chicken

Given that humans are visual creatures, the first thing you may notice is that there’s only one photo.  I forgot to take any pictures until the very end.  So much for montages of lemons and herbs.  But at least I remember to take at least one photo (it was actually closer to 4 but the others are very similar to the one above).

And that has almost nothing to do with this recipe.  This is part of my own desire to figure out what to do with boneless, skinless chicken breasts (a.k.a. the wonder bread of the protein world).  I make chicken marsala with it and that’s about it.  But I’m always willing to try something new.

Lemon and chicken are a classic combination and adding herbs can only make it better.  And, for a chicken breast, this is a good application.

This will not cause a transcendental experience.  It won’t remind you of your childhood or a long lost love.  But it is a good way to turn a meal that could be reminiscent of cardboard into something that’s actually tasty.  To claim that it was excellent would be a lie, it merely qualifies for the label good.  But that’s not a bad thing.  In fact, for a weeknight dinner, it’s exactly what I want.

It went well with garlic mashed potatoes and peas with prosciutto. The 2004 La Chablisienne Chablis 1er Cru Grande Cuvée (available at Costco of all places) complimented it nicely.

Lemon-Herb Chicken
Adapted from The Cuisine of California

Marinade:
zest of 1 lemon, minced
juice of 1 lemon
1 tbsp olive oil
1 tbsp finely chopped fresh herbs (any combination of rosemary, thyme, parsley, and basil)
2 tbsp dry vermouth
1/4 tsp honey
pinch of salt
pinch of black pepper

2 boneless, skinless chicken breast halves
1 tbsp butter
1 tbsp olive oil
1/4 cup cream
salt and pepper

  1. Mix the marinade ingredients together in a small bowl.  Pour over the chicken breast in a non-reactive container.  Allow to marinate for 4 hours.
  2. Remove the chicken pieces from the marinade, reserving the marinade.
  3. Heat the butter and olive oil over medium-high heat in a large sauté pan.  Cook the chicken in the pan, about 5-7 minutes per side (be careful as the marinade will allow the chicken to brown very quickly).  Remove the chicken to a side dish.
  4. Add the reserved marinade to the pan and boil until it is reduced to 2 tbsp.  Add the cream and simmer until the cream has thickened slightly.
  5. Return the chicken to the pan and coat with the sauce, making sure the chicken is warm.
  6. Serve the chicken immediately with the sauce on top.

Serves 2.

Fettucine con Salsa di Gorgonzola (Fettucini with Gorgonzola Sauce)

Fettucine with Gorgonzola Sauce

Angela left me to my own devices this past week as she was out of town attending a wedding.  Some may look at this as a tragedy; I merely look at it as an opportunity to eat things she doesn’t like.

In college, I independently developed something similar to this recipe.  It developed as an elaboration of a fettucine alfredo recipe I found in a Betty Crocker cookbook that was owned by my roommate.  I no longer make that recipe as I’ve moved on to better and (to my thinking at least) more authentic recipes.

However, there’s a bit of a story to that fettucine alfredo recipe.  It was one of the first things I ever cooked from a published recipe.  But, more importantly to me at least, was that it was the first thing I ever cooked for Angela.

As documented in the about page, this was an effort to impress here. And apparently it worked.

But that has very little to do with this recipe as Angela doesn’t like Gorgonzola cheese (or really any blue cheese) which is why I made this recipe when she was gone. It’s a rather simple recipe. The most time was taken up in making the pasta.

My pasta making technique has been modified a bit now.  I tend to add a little bit of olive oil and salt to the dough.  I’m not sure if I can taste a difference or not but it’s been working for me.  I also use large eggs now as I’ve started buying the dark yolk eggs from Trader Joe’s.  If anything, the dough has been easier to work with with large eggs as opposed to extra large eggs.

The Gorgonzola sauce is quite good if fattening.  The flavor of the Gorgonzola definitely ripens as it is allowed to sit at room temperature but the sauce itself is very well balanced.  It went well, for me, with a 2005 Palmina Dolcetto.

Homemade Pasta

Fettucine con Salsa di Gorgonzola (Fettucini with Gorgonzola Sauce)
Adapted from Essentials of Classic Italian Cooking

1/4 lbs. Gorgonzola, left at room temperature for at least 6 hours
1/3 cup whole milk
3 tbsp butter
salt
1/2 cup heavy cream
1 1/4 lbs. fresh fettuccine (preferably homemade)
1/3 cup grated parmesan cheese

  1. In a large saucepan, place the gorgonzola, milk, and butter over low heat.  Stir with a wood spoon, breaking up the gorgonzola.  Cook for a minute or two or until the butter melts.
  2. Add the heavy cream and increase the heat to medium-low.  Cook until the heavy cream has thickened slightly, about 2 minutes.
  3. Cook the pasta in boiling salted water until slightly undercooked.  Add the pasta to the sauce.
  4. Cook the sauce for 1 minute more, stirring in the pasta.
  5. Stir in the parmesan cheese.
  6. Serve immediately with extra grated parmesan cheese on top.

Serves 4.

Mock Porchetta

Mock Porchetta Served

Ever since I had heard of porchetta, I have lusted after it. A whole pig stuffed with garlic, herbs, and other seasonings? Yes, please! It’s almost like an Italian version of barbeque.

Despite my pretensions, there’s no way I’m going to cook a whole pig, particularly in my small apartment kitchen. I don’t think it would fit in my oven for one.

Mock Porchetta Cooking

This isn’t a real porchetta. Given I have no baseline for real porchetta, I don’t even know how it compares. It is, however, good and I think it might be a good approximation.

I waited to make this until I had a “special occasion” (a.k.a. when it would be more than just Angela and I for dinner). The opportunity presented itself when my parents came to visit.

This is actually a great meal to make when having company. While it takes a long time to cook (and does require advanced preparation), it requires little in the way of real work. Most of the cooking is done unattended and only needs to be checked on once every hour or so. Having a whole meal in one dish doesn’t hurt.

The only proof you should need that the mock porchetta is good is that my mother asked for a copy of the recipe.

I served the mock porchetta with a homemade baguette and a bottle of 2004 Dopff & Irion Riesling Schoenenbourg. Dessert was homemade orange ice cream.

Mock Porchetta seasoned and tied

Mock Porchetta
Adapted from The Zuni Cafe Cookbook: A Compendium of Recipes and Cooking Lessons from San Francisco’s Beloved Restaurant

1 2-1/2 to 3 lbs. pork butt roast
salt
1 tbsp capers, rinse, soaked, dried and chopped
1 tsp chopped lemon zest
3 garlic cloves, coarsley chopped
12 fresh sage leaves, crushed and chopped
2 sprigs rosemary, leaves stripped and chopped
2 tsp fennel seeds, crushed
1 1/2 tsp ground black pepper
2 lbs. peeled and sliced potatoes, carrots, and red onions
olive oil
2/3 cup pork stock or chicken stock
2 tbsp dry vermouth

  1. In a bowl, combine the capers, lemon zest, garlic, herbs, fennel seeds, and pepper in a small bowl. Mix well.
  2. Trim all but 1/4″ of fat off the sides of the pork butt. Cut into the pork butt to open up as much surface area as possible while only opening up natural seams in the meat. (If you use a portion near the bone, the natural pocket left by the bone may suffice for this portion).
  3. Season the inside of the pork with salt evenly. Rub the herb mixture all over the inside of the pork. Season the outside of the pork.
  4. Tie the pork to form a uniform shape.
  5. Cover the pork and allow to sit in the refrigerator for 1 to 3 days.
  6. Remove the pork an hour before cooking to allow it to come to room temperature.
  7. Preheat the oven to 350°F.
  8. Toss the vegetables in a minimum of olive oil, so that they are barely coated. Season with a few pinches of salt.
  9. Heat a dutch oven over medium heat until hot. Add the pork roast and surround with the vegetables.
  10. Place in the oven and bake for 1 hour.
  11. After an hour, turn over the meat and rotate the vegetables.
  12. Bake for 1 hour more.
  13. Add 1/3 cup of the stock, return to the oven, and bake for 15 to 30 minutes more, to 185°F.
  14. Remove from the oven. Remove the pork and vegetables, cover with aluminum foil.
  15. Deglaze the dutch oven with the vermouth and remaining stock. Bring to a simmer and scrape any browned bits off the bottom of the pan. Simmer to reduce the sauce slightly.
  16. Slice the pork and serve garnished with the vegetables and sauce.

Serves 4 to 6.

Sanguinaccio (Bittersweet Chocolate Pudding)

CRW_1927

Chocolate pudding invariably brings back memories of childhood. I doubt that there have ever been children that dislike pudding. It’s got a cream texture and it comes in so many flavors that there has to be one that you enjoy.

During my childhood, I didn’t get the pudding in the now familiar pudding snack form (which my wife still likes). My mom would make pudding from the Jello box (and never the generic brand).

Every few months, I’d notice that there was a bowl of pudding chilling in the refrigerator and I knew it would appear on the table after dinner for dessert (which, despite the fact that he rarely made it, my dad insisted on presenting). Or better yet, I’d get to eat it for breakfast.

CRW_1815

This, however, is not the pudding of my childhood. It’s much richer and more chocolaty. The spices also make it a bit different. But, at it’s core, it’s still chocolate pudding.

I failed to properly melt all the chocolate in the pudding so there were small chunks floating around. Personally, I enjoyed having a bit more texture to the pudding but it isn’t the intended effect so, assuming you want smooth pudding, make sure to stir until all the chocolate has melted.

I liked the pudding, both for dessert and breakfast. It went particularly well with some whipped cream.

CRW_1922

Sanguinaccio (Bittersweet Chocolate Pudding)
Adapted from Molto Italiano: 327 Simple Italian Recipes to Cook at Home

1 cup unsweetened cocoa powder
1/2 cup all purpose flour
2 cups sugar
4 1/2 cups whole milk
12 oz. bittersweet chocolate, chopped
1 tsp vanilla extract
1 tsp ground cinnamon

  1. In a bowl, whisk together the cocoa powder, flour, and sugar. Slowly whisk in the milk until it forms a paste than whisk in the remaining milk.
  2. Transfer the milk mixture from the bowl into a sauce pan and bring to a simmer over medium heat.
  3. Remove the milk mixture from the heat and return to the bowl. Stir in the chocolate, vanilla, and cinnamon and whisk until the chocolate is completed melted.
  4. Allow the pudding to cool to room temperature then chill in the refrigerator.
  5. Serve the chilled pudding topped with whipped cream.

Makes 10 servings.