Posts Tagged 'Chicken'

Chicken Teriyaki

Chicken Teriyaki

Upon arriving home from work today, there was a pair of chicken quarters starring at me from the refrigerator accusingly.  My original plan was to grill the chicken but, despite the very obvious heralds of Spring, my plan was thwarted by the appearance of rain.  While sitting on an endless conference call at work today, I contemplated my predicament.  And, from some recess of my brain, came the idea of chicken teriyaki.

My experience with cooking Japanese food is basically non-existent.  To me, Japanese food is intimidating.  It is not only rooted in alien and unfamiliar techniques, it is also known for its simplicity and attention to detail.  It is not only outside my comfort zone, it also has the reputation, to me at least, of being exacting and requiring skill to pull off correctly.

Despite my preconceived fears, this is a very simple recipe.  The hardest part is probably the shopping but sake and mirin are commonplace anymore.  While the ingredients are fairly simple, the outcome is definitely more than the sum of its parts.  But it’s also self-evident that the quality of the ingredients is paramount.  Good chicken, pasture raised, preferably from a small farmer or farmer’s market (as mine was) will elevate this dish from the pedestrian to the sublime. And, while I’m no expert on Japanese food, that is the exact impression I’ve always gathered from it.

Chicken Teriyaki
Adapted from The Best Recipes in the World

4 bone-in chicken quarters
2 tbsp water
1/3 cup sake
1/3 cup mirin
2 tbsp sugar
1/3 cup soy sauce

  1. Pre-heat a large skillet over medium-high heat.  Add the chicken, and cook for 15-20 minutes, turning as needed, until the chicken is mostly cooked (to an internal temperature of approximately 150°F).
  2. Remove the chicken from the skillet.
  3. Reduce the heat to medium.  Deglaze the pan with the water.  Add the sake, mirin, sugar, and soy sauce.
  4. When the sauce begins to bubble, return the chicken to the skillet.  Cook, turning the chicken in the skillet, until the sauce becomes almost a glaze and the chicken is well coated.
  5. Serve immediately with sticky rice.

Serves 4.

Ad Hoc Buttermilk Fried Chicken

The last several months have been as busy as any in my life.  We’re coming to the end of a large project at work which means that the hours are particularly long and I’ve had to travel for business for several weeks.  Add to that the holidays and a vacation, it means that I’ve barely had time to make dinner, let alone post about it.

But I did have enough time make some fried chicken the other night.  I’ve tried quite a few recipes for fried chicken, including one I posted before. And while some of them have been good, I never quite found one that was perfect. I think I’ve come a lot closer.

Before it was completely sold out nearly everywhere, Angela bought me the Ad Hoc Cookbook for my birthday. And one of the first recipes I had to try was for the fried chicken.

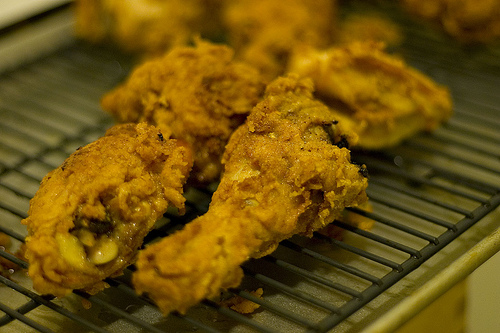
The brine keeps the fried chicken from drying out while adding flavor to the meat.  The crust is nearly perfect.  I kept picking out pieces that had fallen off the frying chicken and eating it.  It was even better eaten with the chicken.

Ad Hoc Buttermilk Fried Chicken
Adopted from Ad Hoc at Home

2 1/2 to 3 lbs chicken
2 cups buttermilk
peanut oil for deep frying

Brine:
8 cups water
1 lemon, halved
6 bay leaves
1 small bunch thyme
1 small bunch Italian parsley
2 tbsp honey
5 garlic cloves, cut in half width-wise
1/2 cup kosher salt

Coating:
3 cups all-purpose flour
2 tbsp garlic powder
2 tbsp onion powder
2 tsp paprika
2 tsp cayenne pepper
2 tsp kosher salt
1/2 tsp ground black pepper

  1. Bring the brine ingredients to a boil in a large pot.  Remove from the heat and allow to cool to room temperature.  Chill in the refrigerator until cold.
  2. Cut the chicken into 10 pieces (2 wings, 2 thighs, 2 legs, 4 breast pieces).  Add to the brine and refrigerate for 12 hours.
  3. Remove the chicken from the brine and allow it to rest in the refrigerator for at least several hours.
  4. Remove the chicken from the refrigerator 1 1/2 hours before cooking.
  5. Heat the oil in a large pot to 320ºF.
  6. Prepare two baking sheets with cooling racks on them.
  7. Whisk together the coating in a shallow bowl.  Place the buttermilk in another shallow bowl.
  8. Dredge the chicken, first through the flour coating, then in the buttermilk, then again in the flour coating.  Place the chicken on one of the baking sheets.
  9. When the oil is hot, add the legs and thighs to the oil and cook for 3 to 4 minutes or until it begins to color.
  10. Add the breast and wing pieces to the oil and cook for 10 to 12 minutes more or until the chicken is nicely browned and cooked through.
  11. Remove the chicken and place on the second baking sheet.
  12. Allow the chicken to cool slightly then serve.

Serves 2 to 3.

Whiskey-Glazed Smoked Chicken

Smoked Chicken

Last December, as we were getting the keys to our new house from our landlord, we walked in and there was a giant box sitting in the middle of the empty living room.  It turns out that Angela bought me a smoker for Christmas. It just turned out that it arrived before we did.

I’ve used it a number of times since then and have mostly stuck to the “classics.” I’ve done pulled pork several times but I have trouble cooking it long enough to get it truly tender (I haven’t made myself get up earlier enough). The same issue came with brisket. But what truly shows the beauty of smoked meat is poultry. It’s not classic barbecue but chicken and turkey absorb the smoke beautifully. Not to mention the gorgeous exterior. I’m already planning to smoke a turkey for Thanksgiving this year.

I decided to change things up slightly on this chicken.  I usually smoke foods with hickory but I decided to give mesquite a try. I’ll gladly admit to be a novice smoker but there is a definitive difference between the hickory and the mesquite. The mesquite is a bit sharper and tangier in taste. While I don’t think it would work as well as hickory on pork, it adds a really nice bite to the chicken.

A smoker is really a bit of an extravagance but the more I use it, the more I know I wouldn’t want to live without it.

Whiskey-Glazed Smoked Chicken
Adapted from Charcuterie: The Craft of Salting, Smoking, and Curing

Brine:
1 gallon/4 liters water
1 1/2 cups /350 g kosher salt
1/2 cup / 125 g sugar
8 tsp / 42 g pink salt

1 3-to-4 lbs. chicken, trussed

Glaze:
1 cup/250 milliliters whiskey
1/2 cup/125 milliliters maple syrup
1/4 packed cup/50 g dark brown sugar
pinch of cayenne pepper

  1. Combine all the brine ingredients in a large pot and bring to a simmer, stirring to dissolve the salt and sugar.  Remove from the heat.  Cool to room temperature.  Chill in the refrigerator until cold.  Place the chicken in the brine, weight it down, and brine it for 18 hours.  Remove the chicken from the brine, rinse it under running water, dry it with paper towels, and allow it to rest in the refrigerator for at least 3 hours.
  2. An hour before smoking the chicken, remove it from the refrigerator.
  3. Hot smoke the chicken at 200ºF until it reaches an internal temperature of 165ºF, 3 to 4 hours.
  4. While the chicken is smoking, place all the glaze ingredients in a sauce pan and bring to a boil.  Reduce the heat to a simmer and simmer until the glaze is reduced to 1 cup.
  5. An hour and a half into smoking the chicken, brush the chicken with some of the glaze.
  6. When the chicken is finished cooking, remove it from the smoker.  Brush it with the remaining glaze and let it rest for 15 minutes.
  7. Serve immediately.

Serves 4.

Souvlaki kotopoulo (Chicken Souvlaki)

Chicken Souvlaki

Apparently I’m still on the once-a-month schedule.  I hope to get a bit better about that.

When we lived in California, we were on a second floor apartment without a balcony.  So, despite the near constant beautiful weather there, we couldn’t do any grilling.  I’d be walking home and could only jealously smell the cooking meat where I had to go home into the stifling heat of an un-air-conditioned apartment.  When we moved to Virginia, Angela and I each had a different requirement for our new home: she wanted a washer-and-dryer in-unit and I wanted some form of outdoor space.  Luckily, we found a place where we both could be accommodated.

As soon as the weather turned this spring, we took the coupon Lowe’s had helpfully sent us in the mail and purchased a Weber grill.  Alison came over and we grilled both Saturday and Sunday.  Since then, we’ve dodged the frequent thunder storms to mostly grill hamburgers and steak.

I’ve only ventured into making Greek food a few times but Costco had a good deal on a Greek cookbook and I’ve always liked Greek restaurants.  I figured chicken souvlaki would be a good starting point as it was familiar (eventhough I always get tempted by gyro’s when I eat at Greek restaurants).

When I went to turn the chicken for the first time, I knew it would be good when I saw the gorgeous color it had turned.  It tasted just as good.  I suggested making lamb souvlaki sometime in the future and Angela asked why I wouldn’t just make the chicken souvlaki again.  Which is indeed a good question.

I almost wouldn’t recommend making this in a broiler.  I doubt the broiler would do it justice.  But it’s simple enough and good enough that I doubt it would turn out badly.  If you’re willing to get the grill out on a weeknight (and honestly, how hard is it really?), this makes an excellent easy meal.  I made this and even had time to make some homemade Tzaziki and pita bread.

Souvlaki kotopoulo (Chicken Souvlaki)
Adapted from Vefa’s Kitchen

1 3/4 lb. boneless, skinless chicken breasts, cut into 1-inch pieces
5 tbsp olive oil
1/2 tsp dried oregano
salt and pepper
1 red onions, quartered and separated
2 tbsp lemon juice

  1. Mix together 3 tbsp olive oil, the oregano, and salt and pepper. Pour over the chicken and toss well.  Cover and refrigerate over night.
  2. Prepare a medium-hot grill.
  3. Thread the chicken pieces onto four skewers, alternating chicken with onion slices.
  4. Combine the remaining 2 tbsp olive oil with the lemon juice and mix well.
  5. Grill the chicken, covered, turning once, until cooked through, about 10 minutes per side, basting with the lemon juice-olive oil mixture frequently.
  6. Allow to rest for 5 minutes then serve with Tzatziki and pita bread.

Serves 4

Zuo Zong Tang Ji (General Tso’s Chicken, Taiwan Version)

Zuo Zong Tang Ji (General Tso's Chicken, Taiwan Version)

One of the very first posts I made to this blog was a version of General Tso’s Chicken.  That version was from Changsha in Hunan province and is fairly close to the version served in America (and, strangely, rarely in Hunan province).  Now, well over a year later, I tried my hand at the Taiwanese version (and succeeded in not gassing myself out of the kitchen this time).

Apparently, this is closer to the original General Tso’s Chicken which was developed in the 1950’s in Taiwan by a Hunanese chef, Peng Chang-Kuei.  He’s also responsible for the other style of General Tso’s Chicken, which is hot and sweetand was developed in New York City.  This version is hot and sour, without the sweetness of the more American version.  Despite the fact that this was not developed in Hunan itself, this version is more Hunanese as it doesn’t have the sweetness.

Of course, the unspoken issue is which is the more authentic version.  I do appreciate authenticity in cooking but I don’t think it matters in this case.  The supposed canonical example of Hunanese cuisine isn’t Hunanese at all.  I don’t think there can even be an authentic version of this dish.

Frying Chili Peppers for General Tso's Chicken

So if authenticity doesn’t matter, which is better?  It’s really hard to say (not the least because of the time delay between the two).  I remember liking the Changsha version a lot despite the high spiciness.  The Taiwanese version is much more challenging to my taste buds.  I’m simply not particularly used to food that is hot and sour.  Angela enjoyed the Taiwanese version a lot; she was already asking when I could make it again.

So my advice is simple.  Make both this version and the Changsha version and see which you like better.  Or realize that they’re different enough that you can enjoy both.

Frying chicken for General Tso's Chicken

Zuo Zong Tang Ji (General Tso’s Chicken, Taiwan Version)
Adapted from Revolutionary Chinese Cookbook: Recipes from Hunan Province

4 boneless, skinless chicken, thighs
6-10 oz. dried red chilies
2 tsp finely diced ginger
2 tsp finely diced garlic
2 tsp sesame oil
peanut oil for frying

Marinade:
2 tsp light soy sauce
1/2 tsp dark soy sauce
1 egg yolk
2 tsp potato flour or corn starch
2 tsp peanut oil

Sauce:
1 tbsp tomato paste mixed with 1 tbsp water
1/2 tsp potato flour or corn starch
1/2 tsp dark soy sauce
1 1/2 tsp light soy sauce
1 tbsp clear rice vinegar
3 tbsp chicken stock

  1. Cut the chicken thighs into similiarly sized, bite size pieces.
  2. For the marinade, combine the soy sauces and egg yolk with the chicken and mix well.  Then stir in the potato flour.  Finally, stir in the potato flour or corn starch.  Set aside to marinate for 30 minutes.
  3. Combine the sauce ingredients in a bowl.
  4. Cut the chilies into 3/4″ pieces and discard the seeds.
  5. Heat enough oil to deep fry the chicken in a wok until it reaches 350ºF.  Add the chicken and deep fry until the chicken becomes crisp and golden.  Remove the chicken and drain on paper towels.  Pour the oil from the wok into a heat proof container.
  6. Return the wok over high heat and add 2-3 tbsp of the peanut oil.  Add the dried chilies and stir fry until they start to turn brown.
  7. Add the ginger and garlic and stir fry for several seconds.
  8. Add the sauce and stir regularly until it thickens.
  9. Return the chicken to the sauce and stir to coat the pieces in the sauce.  Remove from the heat.
  10. Stir in the sesame oil.
  11. Serve immediately over white rice.

Serves 4.

Yosemite Campfire Cooking – Southern Delaware BBQ Chicken

Southern Delaware BBQ Chicken cooking over a campfireThis past weekend we went camping at Yosemite National Park. We took my cousin’s daughters, Ivy and Makayla, with us. Differing from the majority of visitors, we stayed in the high country at Tuolomne Meadow.

Cathedral DomeAngela and I enjoy Yosemite a lot and visit at least once a year (depending on how often we can get reservations). Over the course of our visits, we’ve found that while we enjoy the valley, the real draw for us is the high country where the crowds (and the air) are thinner. The valley seems like a tourist attraction while the high country is more like a national park. We even noticed this as far as campers go: there are far fewer motor homes at Tuolomne Meadow than at the campgrounds in the valley. And, frankly, that’s the way we like it.

When we go to Yosemite, we plan on hiking. This trip, we may have overdone it (please remember that we both live in the city and work in offices before passing judgment on our athleticism). When we first arrived, we set up camp, and then hiked to the top of Lembert Dome. This isn’t a hard hike (Angela and I had actually done it the previous year) but everything’s a bit harder at 8500 ft (and that’s just the starting elevation).

The second day we decided to hike to Cathedral Lake. It was listed as moderately difficult and it was only 7 miles round trip. Plus, the topographical map made it look like it only had a few steep parts and they wouldn’t be too long.

How wrong we were. Perhaps we were out of shape. Perhaps it was the elevation. Perhaps it was because we were sore from the previous day’s hike or from sleeping on the hard ground. It doesn’t matter why but we had a rather difficult time hiking their and back. The guidebook listed it as a 4 to 6 hour hike (depending on whether you just visit Lower Cathedral Lake or head on to Upper Cathedral Lake); it toot us 6 hours just to go to Lower Cathedral Lake and return.

Now, I probably come across as hating the hike. But I didn’t. Cathedral Lake is beautiful. The hike was beautiful. I just didn’t enjoy walking uphill for that long. I may not hike it again but I’m glad I did it the first time.

View from Atop Lembert Dome

But this is a food blog, not a hiking blog. We did eat and we did eat well. The major difficulty of the trip wasn’t the hiking, it was the starting of a camp fire where there’s little oxygen. It may be that I’m incompetent when it comes to campfires (not unlikely really), but I could barely get one going Friday night and Saturday it took half a bottle of lighter fluid and a couple of Coleman fire starting things. It only got going Saturday night when I sent Angela to the camp store to buy charcoal (which went unused and we left for the next campers).

El CapitanOnce the fire finally got started, I got to make something that I can rarely make properly because we have no grill (because we have no place to grill). This marinade is designed for grilling and for anything else it really doesn’t work well.

I call this Southern Delaware BBQ Chicken but it doesn’t have a formal name per se. It’s a family recipe. It’s something that my grandfather, who lives in southern Delaware, used to make and now has passed on to his grandchildren. He even made custom grates for holding and turning the chicken. Part of my childhood was eating barbecued chicken with corn on the cob and potato salad on hot summer days. We always had watermelon for dessert. A few years ago, my grandfather made sure to teach some of his grandchildren (myself included) how to properly cook the chicken.

Given I had a chance to finally grill something, I decided that I needed to make the chicken. To be honest, this isn’t my grandfather’s rendition as I had didn’t have the hours (or the equipment) to grill it to his standards. But, it’s still good. I hope you can enjoy this as my family has. And my apologies to my cousins if I’m letting out any family secrets.

Southern Delaware BBQ Chicken cooking over a campfire

Southern Delaware BBQ Chicken

4 chicken quarters

Marinade:
5 tsp salt
1/4 tsp pepper
1 1/2 tsp poultry seasoning
1/4 tsp paprika
1 cup cider vinegar
1 egg, well-beaten
1 cup vegetable oil

  1. Trim the chicken of excess fat.
  2. To make the marinade: Mix together the dry ingredients. Add the vinegar and the egg and whisk to combine. Whisk in the cooking oil.
  3. Pour the marinade over the chicken and refrigerate for 1 day.
  4. Grill the chicken, turning regularly and basting with the excess marinade regularly, until cooked through.
  5. Serve immediately

Serves 2 to 4.

Pot-Roast Chicken and Vegetables

Pot-Roast Chicken and Vegetables

Despite the fact that Angela may claim that I’m always looking for a harder way to do something in the kitchen, I do really appreciate simple and easy food as long as it’s also good.  This manages to be all three.

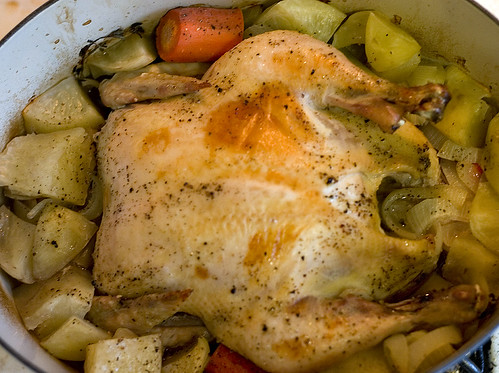
Simply, this is pot-roasted chicken with vegetables.  There aren’t any complicated ingredients.  There aren’t any complicated instructions.  You put everything in a pot and you cook it.   Like the best simple things, it also manages to taste good.

Vegetables for Pot-Roast Chicken

This would be a near perfect meal to prepare when having guests: simply pile everything into a pot and place it in the oven.  Remove it when the guests arrive and serve.

But what really appeals to me about this recipe is that it almost literally calls for elaboration.  Substituting different vegetables would almost be a no-brainer.  Tarragon could replace the thyme.  The chicken could first be browned in the pot and the vermouth be used to deglaze.  The sauce could be reduced at the end or enriched with butter.

If you look closely, you’ll notice that the ingredient amounts listed below do not match the pictures.  It’s simply that there are only two of us and it’s easier for me to find a way to use the leftover chicken (it ended up in ravioli with spinach and parmesan cheese) then it is for me to find a way to use the leftover chicken as well as leftover vegetables (we still ended up with leftover vegetables; according to the cookbook, pureeing leftover vegetables with leftover sauce makes a good soup).

While simple, this was really quite good.  What really struck me was the fact that very little work led to quite a good dinner.

Pot-Roast Chicken Ready to Cook

Pot-Roast Chicken and Vegetables
Adapted from The River Cottage Cookbook

1 four to six lbs. chicken
2 onions
3 carrots
3 leeks
3 potatoes
2 bay leaves
2 to 3 sprigs of thyme
1 tbsp butter, softened
1 cup dry vermouth
1 cup water
salt and pepper

  1. Preheat the oven to 375ºF.
  2. Peeled the onions, carrots, and potatoes.  Cut the carrots and potatoes into large chunks.  Slice the onions.  Cut the white portion of the leeks into large chunks and discard the rest.
  3. Place the chicken in a large dutch oven.  Surround the chicken with the vegetables and herbs.  Rub the butter onto the exposed portion of the chicken.  Season the chicken and vegetables with the salt and pepper liberally.  Pour the vermouth and water into the dutch oven.
  4. Cook the chicken, covered, in the oven for 50 minutes.
  5. Uncover and cook for 25 to 35 minutes more.
  6. Remove from the oven.  Carve the chicken into large pieces.
  7. Serve the chicken and vegetables with the sauce.

Serves 4 to 5.

Lemon-Herb Chicken

Lemon-Herb Chicken

Given that humans are visual creatures, the first thing you may notice is that there’s only one photo.  I forgot to take any pictures until the very end.  So much for montages of lemons and herbs.  But at least I remember to take at least one photo (it was actually closer to 4 but the others are very similar to the one above).

And that has almost nothing to do with this recipe.  This is part of my own desire to figure out what to do with boneless, skinless chicken breasts (a.k.a. the wonder bread of the protein world).  I make chicken marsala with it and that’s about it.  But I’m always willing to try something new.

Lemon and chicken are a classic combination and adding herbs can only make it better.  And, for a chicken breast, this is a good application.

This will not cause a transcendental experience.  It won’t remind you of your childhood or a long lost love.  But it is a good way to turn a meal that could be reminiscent of cardboard into something that’s actually tasty.  To claim that it was excellent would be a lie, it merely qualifies for the label good.  But that’s not a bad thing.  In fact, for a weeknight dinner, it’s exactly what I want.

It went well with garlic mashed potatoes and peas with prosciutto. The 2004 La Chablisienne Chablis 1er Cru Grande Cuvée (available at Costco of all places) complimented it nicely.

Lemon-Herb Chicken
Adapted from The Cuisine of California

Marinade:
zest of 1 lemon, minced
juice of 1 lemon
1 tbsp olive oil
1 tbsp finely chopped fresh herbs (any combination of rosemary, thyme, parsley, and basil)
2 tbsp dry vermouth
1/4 tsp honey
pinch of salt
pinch of black pepper

2 boneless, skinless chicken breast halves
1 tbsp butter
1 tbsp olive oil
1/4 cup cream
salt and pepper

  1. Mix the marinade ingredients together in a small bowl.  Pour over the chicken breast in a non-reactive container.  Allow to marinate for 4 hours.
  2. Remove the chicken pieces from the marinade, reserving the marinade.
  3. Heat the butter and olive oil over medium-high heat in a large sauté pan.  Cook the chicken in the pan, about 5-7 minutes per side (be careful as the marinade will allow the chicken to brown very quickly).  Remove the chicken to a side dish.
  4. Add the reserved marinade to the pan and boil until it is reduced to 2 tbsp.  Add the cream and simmer until the cream has thickened slightly.
  5. Return the chicken to the pan and coat with the sauce, making sure the chicken is warm.
  6. Serve the chicken immediately with the sauce on top.

Serves 2.

Pollo al Diavolo (The Devil’s Chicken)

Pollo al Diavolo

Some recipes manage to surprise me. Pollo al diavolo is a fairly common recipe for Italian (and Italian-American) cookbooks. Usually, it’s just a spicy chicken that’s either sautéed or braised. It’s rarely bad but it’s become normal and expected.

This recipe was not at all what I was expecting. To be honest, I was sold on this recipe merely because the picture of it looked good (unfortunately, I don’t think my pictures turned out as well). I saw the name and recognizing that it implied spicy food, I figured it’d make a good dinner.

Except, this was significantly different than any version of Pollo al diavolo I had ever had. Most are spicy through red pepper flakes; this is spicy through the black pepper it’s cooked with as well as a spicy oil (olio picante) that you can optionally drizzle over top (I chose to, Angela didn’t).

Despite the relatively short period of time that the black pepper mixture is on the chicken, the pepper taste is absorbed by the chicken. Unlike my experiences with steak au poivre (which I would happily accept as mistakes in my cooking), the pepper did not overpower the taste of the chicken but merely complemented it. I found that the olio picante also complemented the chicken but it tastes primarily of jalapeños with a surprisingly muted heat.

The brining of the chicken is my addition to this recipe (it wasn’t in the original). It did help to make the chicken nice and juicy. If I were to make it again (and I probably will so this can be considered a note to myself), I’d probably add crushed black pepper corns to the brine.

I enjoyed the parsley salad although the parsley portion of it was my least favorite. I’d be happy to substitute a different leafy green for the parsley and I can’t imagine it wouldn’t improve the outcome. The vinaigrette nicely contrasts with the spiciness of the chicken.

As I said, my overall impression of this was surprise. It was less spicy than I expected and the spice was completely different. It’s a much more elegant version of a normally pedestrian dish.

Roast Pollo al Diavolo

Pollo al Diavolo (The Devil’s Chicken)
Adapted from Molto Italiano: 327 Simple Italian Recipes to Cook at Home

Brine:
1 gallon water
1 cup/225 grams kosher salt
1/2 cup/125 grams sugar

1 three-to-five lbs. chicken
1/4 cup ground black pepper
6 tbsp olive oil
2 tbsp dijon mustard
1 cup chopped Italian parsley
1 red onion, thinly sliced
12 cherry tomatoes, halved
1 tbsp red wine vinegar
olio picante

  1. In a sauce pan over high heat, combine all the brine ingredients. Bring to a simmer, stirring until the salt and sugar are dissolved. Remove from heat and allow to cool to room temperature. Put the brine in the refrigerator and allow to chill. Add the chicken and brine for 8 to 12 hours. Remove the chicken from the brine, rinse, and pat dry with paper towels. Allow the chicken to rest in the refrigerator for at least 8 hours.
  2. Preheat the oven to 400°F.
  3. Truss the chicken and baste it all over with the olive oil.
  4. Place in a roasting pan and roast in the oven for 40 minutes.
  5. Combine the 1/4 cup black pepper, a pinch of salt, and the mustard and whisk together. Drizzle in 1 tbsp of olive oil, whisking until blended.
  6. Remove the chicken from the oven and brush the chicken with the pepper-mustard mixture all over. Return the chicken to the oven for another 30 minutes.
  7. Remove the chicken from the oven and allow to rest for 10 minutes.
  8. Meanwhile, combine the parsley, onion, tomatoes, vinegar, 3 tbsp olive oil, salt and pepper in a bowl and toss well.
  9. Carve the chicken and serve it with the parsley salad and drizzle it with the olio picante.

Serves 4.

Parsley Salad


Olio Picante (Spicy Oil)
Adapted from
Molto Italiano: 327 Simple Italian Recipes to Cook at Home

1 cup olive oil
4 jalapeños, seed and diced
1 tbsp red pepper flakes
1/2 tbsp Spanish smoked paprika

  1. In a saucepan, combine all the ingredients and heat until the oil reaches 175ºF.
  2. Remove from the heat and allow to stand overnight.
  3. Strain the solids out of the oil.
  4. The oil will keep for up to 3 weeks in a cool, dark place.

Makes 1 cup of oil.

Herb-Brined Roast Chicken

It's surprisingly difficult to photograph a roast chicken

Currently, whenever I think of roast chicken, I think of the roast chicken I shared with friends, in the rain, in Versailles, France. We had just taken the train in from Paris to visit the eponymous Château. We were hungry and our guide book directed us to the local farmer’s market. We eventually settled on a roast chicken and a loaf of bread. We huddled under an archway and, after the first couple bites, literally tore the chicken apart. I don’t know if it was the setting, the company, or if the chicken was as good as I remember, but it was the best roast chicken I may have ever had.

But, really, is there a need for yet-another-roast-chicken recipe out there? Has there ever been a cookbook published without one? Hyperbole aside, there certainly are enough out there. I’ve even posted one.

So why another one? Well, I originally used this brine for a turkey at Thanksgiving (if you wish to do so, increase the brine time to 24 hours). The turkey turned out excellently so I thought I’d apply to a chicken in the future.

And here we are then. I had a craving for roast chicken and I decided to share it with the rest of the world (or the limited portion of it that reads this blog).

The brine is not for the faint of heart (or pocketbook). I’m half convinced I spent more on the brine than on the chicken (and it was an organic chicken!). I wouldn’t use this as an everyday brine but it works well for special occasions. I plan to use the brine again next Thanksgiving.

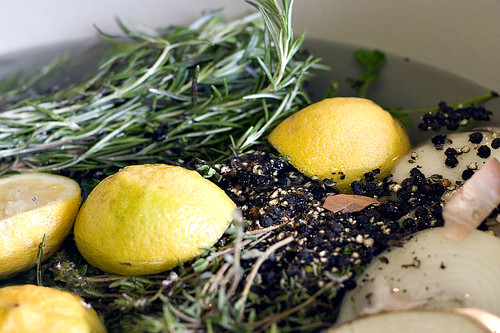
For some reason, I feel like I'm wasting everything that goes into the brine

Herb-Brined Roast Chicken
Adapted from Charcuterie: The Craft of Salting, Smoking, and Curing

Brine:
1 gallon water
1 cup kosher salt
1/2 cup sugar
1 bunch fresh thyme
1 bunch fresh rosemary
1 bunch fresh parsley
2 bay leaves
1 head garlic, cut in half horizontally
1 onion, sliced
3 tbsp black peppercorns, crushed
2 lemons, halved

1 whole 3-to-4 lbs. chicken

  1. Combine all the brine ingredients in a large pot; squeeze the lemons as they are added. Bring to a simmer over high heat to dissolve the salt and sugar. Remove from the heat. Allow to cool to room temperature and then refrigerate until chilled.
  2. Add the chicken to the brine and weigh it down with a plate to keep it submerged. Allow to brine for 8 to 12 hours.
  3. Remove the chicken from the brine, rinse well, and dry with paper towels. Let it rest in the refrigerator for 24 hours.
  4. Remove the chicken from the refrigerator an hour before cooking.
  5. Preheat the oven to 450ºF.
  6. Roast the chicken in a roasting tray until it reaches an internal temperature of 160ºF. Remove from the oven and allow to rest for 15 minutes.
  7. Serve immediately.

Serves 3 to 4.