Archive Page 14

San Francisco Trip

CRW_9615

This past weekend, we went to San Francisco to celebrate our first wedding anniversary. Now, perhaps I’m supposed to post some sappy pictures or talk about love, but I’m not really into that and I’m pretty sure that’s not why anyone is reading this. So congratulations to us and all that jazz (well, really to me as Angela hasn’t killed me yet).

CRW_9618

We didn’t a bunch of the touristy things (go to the Legion of Honor, Fisherman’s Wharf, and China Town) and, while they were interesting, I have no need to write about them here. Instead, I can talk about food (and bore you with that instead).

Our first meal of interest was for lunch on Friday. We went to a restaurant in China Town (recommended in the Lonely Planet guide book) whose name I can’t remember for the life of me (it was on Pacific near Sutter). At least where we live in Long Beach, good Chinese food is hard to come by and whatever we get is very Americanized. When we first walked in, it was about 12:30 PM and there were several good omens: the restaurant was crowded, most of the patrons were of an Asian appearance, and most of the languages spoken were Asian and the visible newspapers were written in Asian characters. And the food was excellent. They served us dim sum (although it looked like many of the Asian patrons received some sort of pork and rice bowl) which I had never had before (I’m hopelessly inept on Asian cuisine; I first had sushi about a month ago). The food was excellent. The pork dumplings were my favorite but all of it was quite good. We, uh, we’re too busy eating to take pictures of the first or last set of dim sum.

san-francisco-030

Our first dinner was Thursday night at the Zuni Cafe. Now, the only reason I had heard of the Zuni Cafe, was because of their cookbook and their roast chicken but that was enough for me to get a reservation a month ago (and even then I could only get one at 6:15 PM).

Angela realized she didn’t have her ID when we got off the subway so I had to run back to the hotel to get it (and, of course, we didn’t end up getting carded; asking if a rosé is dry must imply you’re of age). When I got back, we were seated pretty quickly. My appetizer was the Caesar salad while Angela ordered the pappa al pomodoro. We split the roast chicken (of course) along with potato straws (which were probably the best fried potatoes I’ve had; I ended up eating most of the giant pile). For dessert, Angela had cappucino and I had a bittersweet chocolate pudding (I’m pretty sure it had a fancier name that escapes me at the moment). It was all quite good but ended up being too much food for the two of us (what else can I say about good food? it wasn’t a transcendental experience but I did enjoy it).
san-francisco-035san-francisco-036san-francisco-044san-francisco-040

Our final dinner was at the Chez Panisse Café. Who hasn’t heard of Chez Panisse? We (well, I picked it really) decided on the Café as opposed to the restaurant proper as Angela can be a bit of a picky eater (not really that picky but there are certain things she doesn’t eat) and having some choices seemed like a better idea. We were well pleased. What really struck me was the fact that the wait staff managed to be effective and pleasant without being stuffy and pretentious. Now for the food: Angela had, in order, squab broth with scallions, seared tuna, and panna cotta. I had a salad with goat cheese, roast pork leg, and an apple and quince tart with burnt honey ice cream. The food lived up their reputation and, in my mind at least, exceeded it.

san-francisco-048san-francisco-051san-francisco-056
san-francisco-046san-francisco-052san-francisco-055

Our trip was fun and I hope to go back in the near future (Angela wants to move there now). And, really, talking about what food I had a restaurant isn’t all that exciting.

Madeleines

CRW_9610

I have no idea where my love of madeleines developed from. At some point in the past year, I knew that I liked them but I don’t know when I had had them. I do know that the ones usually available in the US are expensive (seriously, Trader Joe’s sells them for about $1 per cookie) and not particularly good.

This summer, I had decided that at some point in the indefinite future I was going to get madeleine pans. Whenever we’d go into a store that would sell esoteric kitchen supplies, I’d look for them and determine that I really didn’t want to buy a single use pan (Alton Brown would be upset with me now) for $12 (realizing that I’d probably need at least two to make them effectively).

CRW_9598

When my in-laws came to visit, we tend to end up at shopping locations more frequently. As I was still on my quest, I continued to look for them and mentioned to my in-laws. About a week after they had left, a package arrived in the mail for Angela and I and, lo and behold, there were two non-stick madeleine pans inside. Apparently, my mother-in-law had decided that she needed to go out and buy them for me right away. Her decision was my gain.

This isn’t the first time I’ve made madeleines but the first time I’ve used this recipe. This recipes seems to produce a better texture but the other recipe (from Susan Herrmann Loomis) seemed to make one with better flavor. I think I may combine the two at a later date. Either way, madeleines are always good.

CRW_9600

Madeleines
Adapted from Baking: From My Home to Yours

1 1/3 cup all purpose flour
1 1/2 tsp baking powder
pinch of salt
1 cup sugar
grated zest of 2 lemons
4 large eggs, at room temperature
4 tsp vanilla extract
12 tbsp melted butter, cooled

  1. Place madeleine pans in the refrigerator.
  2. Mix together the flour, salt, and baking powder in a bowl.
  3. In a mixer’s bowl, mix together the sugar and lemon zest with your finger.
  4. Add the eggs and, using the whisk attachment, mix at medium speed for 2 to 3 minutes. Add the vanilla extract and mix to combine.
  5. Fold in the flour followed by the melted butter.
  6. Remove the madeleine pans from the refrigerator and grease them. Place batter into pans, about 1 tbsp per madeleine.
  7. Refrigerate the pans and any remaining batter for at least 1 hour.
  8. Preheat the oven to 400°F.
  9. Bake the madeleines for 11 to 13 minutes. There’s no need to refrigerate any remaining batter before cooking.

Makes 24 madeleines.

New Toy

CRW_9604

While shopping at Costco today, I ended up buying myself a new toy. In my defense, Angela actually suggested buying it because we weren’t certain how much longer Costco would be selling them (we had only gone there to get hand soap and cat food I swear!).  I’ve always (where always=since I really started cooking a few years ago) wanted one and almost bought an off brand one at Marshall’s last weekend.  So now I just have to come up with a nice braised dish to make in the near future.

On a side note, if you’re interested in picking up Mastering the Art of French Cooking by Julia Child, et al (and you really should if you don’t own it), Volumes 1 and 2 are only $25 at Costco (well, the one near us) which is quite the steal as each volume usually retails for that price.

Spaghetti alla Carbonara

Spaghetti alla Carbonara

Doesn’t look like much does it? And, really, it’s not. Spaghetti alla carbonara is one of my default Angela-is-out-and-I-need-something-for-dinner meal. The critical path (why yes, I’m an engineer) on this dish is cooking the pasta so it isn’t really time or energy intensive. Plus, it tastes good in a comfort food sort of way.

I first tried this dish in Italy and fell in love with it in Rome. I don’t remember the name of the restaurant (I know it’s in a guidebook at home) but I do remember two things about it: it was by Pompey’s theater (which means it was in the Jewish ghetto) and that it opened for dinner at 7:30 PM. I know this second part because I showed up at 7:00 PM and was told that I would have to wait until 7:30 PM. So I waited and I was glad I did as I had the best spaghetti alla carbonara that I’ve ever had.

My version is not as good as that served in Rome. I’ve really had trouble finding a satisfactory recipe. Most recipes say that the pasta will cook the eggs in a bowl. And they’re wrong (possibly dangerously as the eggs don’t really cook). Some recipes say to add cream. Again, they’re wrong; the real dish doesn’t have cream. And serving it with a raw egg may be trendy (I think that’s how Mario Batali serves it at his restaurants) but it’s not particularly appetizing to me.

CRW_9593

My thoughts are that it should be creamy but that the eggs should make it creamy. The only way I’ve found to do that is to slowly cook the eggs with the pasta as if making a custard. Is it authentic? I have no idea (it’s probably not) but it tastes good to me and fulfills my memories of the dish.

The recipe is loosely based on one from a book I bought in Italy, All the Recipes, Pasta of Italian Cuisine. However, the technique of the recipe is pretty much my own creation and I’ve modified the ingredients list a bit. I’ve only ever used panchetta, but I’m sure it would be good with guanciale (more authentic) or even bacon (what’s not good with bacon?). Also, when the recipe says to stir constantly, do so or you’ll end up with scrambled eggs (which, while it may be good, is not spaghetti alla carbonara). Finally, the recipe as listed only serves 1 because Angela doesn’t like it. I’ve also found that the final step of cooking the egg and pasta together seems to work better when there’s less of it. The recipe could easily be multiplied to whatever number of portions you’d like (or depending how hungry you are; this isn’t a lot of food for one person).

CRW_9594

Spaghetti alla Carbonara

4 oz pasta
1 tbsp olive oil
1 oz panchetta, diced
1 garlic clove, peeled
1 egg and 1 egg yolk
4 tbsp Pecorino Romano cheese
salt and pepper

  1. Bring water to a boil, add salt, and cook the pasta. Under cook it by one minute.
  2. While the pasta cooks, in a sauce pan (preferably nonstick), add the olive oil and the garlic clove. Turn the heat to medium. When the oil is hot, add the panchetta and cook until it is browned but not completely cooked (the panchetta will cook for a minute after the heat is off).  Remove the garlic clove.  Turn off the heat.
  3. In a bowl, whisk together the egg, egg yolk, 2 tbsp cheese, salt, and pepper to taste.
  4. When the pasta is finished cooking, strain it and add it to the sauce pan. Pour the egg mixture over the pasta. Prepare a serving bowl. While constantly stirring, turn the heat to medium and cook. When the egg mixture just begins to solidify on the bottom of the pan, turn off the heat and pour to pasta into the prepared serving dish.

Serves 1.

    Bittersweet Brownies

    Bittersweet Brownies

    I don’t make a lot of brownies. Usually, when it’s time for a portable dessert I stick with cookies. Brownies are frequently just too dense for me to eat. However, when she who must be obeyed tells me that I need to make brownies, I usually acquiesce.

    This recipe actually hails from Sunday night as we decided to go out for pizza last night (I need to blame my coworkers as we were talking about a particularly good pizza yesterday; the draw was too much for me once I got home). I honestly had forgotten how easy brownies really are to make (what’s the point of the brownie mixes anyway? the only part that could be conceivably hard is melting the chocolate and you could even do that in a microwave if you so desired).

    These brownies are not chocolate overload. In fact, they’re the exact opposite. The chocolate flavor is intense (it is only bittersweet chocolate after all) but it’s not overwhelming.

    Bittersweet Chocolate

    Bittersweet Brownies
    Adapted from Baking: From My Home to Yours

    1 cup butter, cut into tablespoon sized pieces
    9 oz. bittersweet chocolate, chopped
    1 1/2 cups sugar
    4 large eggs
    2 teaspoons vanilla extract
    1/2 teaspoon salt
    1 cup all purpose flour

    1. Preheat the oven to 325°F. Line a large rectangular brownie pan with aluminum foil (this makes the brownies easier to extract). You may want to grease the aluminum foil. I didn’t and the brownies got somewhat stuck to the aluminum foil.
    2. In a double boiler, melt the chocolate and the butter.
    3. Remove the double boiler from the water (i.e. take the top part off the pot), and whisk in the sugar.
    4. Whisk in the eggs one at a time. Add the vanilla extract and whisk vigorously.
    5. Whisk in the salt and the flour.
    6. Pour the mixture into the prepared brownie pan and smooth out the surface with a spatula.
    7. The recipe says to bake for 20 to 25 minutes. It took me closer to 30 to 35 minutes. Place a skewer into the center of the tray and the brownies are really done when it comes out cleanly.
    8. Remove the aluminum foil from the tray and cut the brownies to whatever size you find appropriate. Turn the brownies upside down and then pull off the aluminum foil.

    Makes a pan’s worth of brownies

    San Francisco Trip Planning

    Angela and I are going to San Francisco for our first wedding anniversary this weekend.  We have dinner reservations at the Zuni Cafe and Chez Panisse Cafe.  Where else should we go?

    Blanquette de Veau à L’Ancienne (White veal stew)

    Look at how off-white my white sauce is

    The name of this dish really stretches the limits of my French ability (which isn’t saying much as I don’t speak French). I did try an online dictionary to translate blanquette which apparently is translated as blanquette in English (I know English is a strange language but I never really though blanquette was part of it; Firefox’s spellcheck hasn’t heard of it). Anyway, it’s basically a white stew.

    The genesis of this dish (well, for me making it) stems from my love of veal. As a note to farmers, please confine cute baby cows to tiny cages in order that they may be slaughtered and I may feast on their succulent flesh. I have no qualms about the condition of the animals as long as they’re still tasty. Which is not entirely true but makes for good copy.

    So, several months ago (at this point, “several months ago” can be construed as a bad sign) I was grocery shopping and happened to notice that there was veal blade steak for sale (not a cut of veal that the grocery store regularly sells; speaking of which, why is there such poor selection of veal and lamb at the average grocery store? I’ve never seen a veal roast of any type anywhere). Not only was it for sale, it was also no sale. So I grabbed the promised deliciousness, after all there was something I could make with it. Once it arrived home, it was put into refrigerator. And it waited. And waited. Until I realized that it was liable to go bad if I left it in there any longer. So, up to the freezer it went. And it waited. And waited. And waited. Realize that several months have passed at this point and it looks like it’s accumulating a significant amount of freezer burn (good thing I didn’t take any pictures of that or I’d be the laughing stock of the food blog world for weeks; or maybe not, there’s at least one advantage to not being popular). And of course I’ve realized by this point that I have no idea what to do with it. It’s shoulder meat which isn’t particularly tender but it’s sold as a steak which would imply that you should pan fry it and cook it quickly but the shoulder part says it should be braised. What to do? As you may assume, I decided to just let it relax in the freezer for awhile (it was kept comfortable by various chicken pieces, some pork chops, several pieces of pork butt, and some veal scallopini).

    The potatoes turned out much more photogenic than I ever imagined

    About a week ago, I decided that it was time to use up all that meat that have been lounging in the freezer for who knew how long (which resulted in the General Tso’s Chicken and the Chicken Pot Pie; I actually have some freezer room available now). On Friday I decided it was time to play my trump card and actually cook (and hopefully eat; it wouldn’t be the first time a meal I’ve made has been inedible) the veal.

    Now, I’ve heard reference to blanquette de veau several times. I know it’s mentioned by Anthony Bourdain in at least one of his books (uh, the one full of short stories) and I know there’s a recipe for it in Les Halles Cookbook (oddly, Amazon is charging more for the paperback version than the hardback version). Of course, being a French classic dish means that it’s almost never served in a restaurant anymore (I think the only places that serve classic French are cruise ships and it’s a bit too exotic, or possibly expensive, for a cruise ship). I had no real clue as to what it was or what it tasted like but I figured it couldn’t be that bad. And when had Julia Child led me wrong?

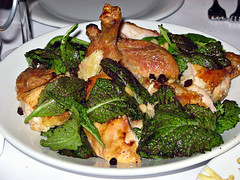
    From what I’ve read (it sounds like I’ve extensively researched this dish; I have not; I’ve just heard reference to it), it’s supposed to be in a white sauce. And it’s supposed to be pretty much completely white. Go look at the pictures I posted and determine if the sauce is white. Sure, it’s not brown by any means but it’s also not the whitest sauce ever (you should’ve seen it before the addition of the cream). And really, I’m okay with that. It all results from the fact that I make much more of a brown chicken stock than a white one. This is the first time I’ve had a recipe that really wanted a white stock and even then, I can’t imagine making it. You mean you want me to generate less flavor by not browning the meat and then you want me to make some Rube Goldberg-esque contraption involving a raft of egg whites? Just so the stock isn’t dark? I’m sure that will fly in a classical French brigade kitchen but I’ve got better things to do with my time than that. There’s, uh, Scrubs reruns to watch. That’s the ticket. So I just used the brown chicken stock I had in my freezer (I really don’t think the taste would’ve changed much).

    Isn't is sad that such beautiful vegetables get thrown away?

    So what’s my opinion of the dish? It’s, uh, different. I’m not used to eating boiled meats and the texture was different (it reminded me of corned beef which is usually boiled). The flavor of the sauce was quite good. The veal probably could of used being salted before being cooked; it seemed like it was missing some salt (there’s no instruction to salt the meat before cooking; is there a reason you wouldn’t want to do that with a dish like this?). Also, the original recipe includes an addition of parsley at the end. The green of the parsley just looked odd and the taste didn’t really mesh with the rest of the dish. I would vote for omitting it. If you want an adventure, go ahead and try it. It’s not as hard or complicated as it looks and you might just like it.

    Blanquette de Veau à L’Ancienne
    Adapted from Mastering the Art of French Cooking


    1 lbs. veal stew meat cut into 1″x1″ pieces (I used veal shoulder blade steak)
    2 to 3 cups chicken stock
    1/2 an onion studded with 1 clove
    1 half of a large carrot, peeled and cut into several pieces
    a bouquet garni consisting of 1 stalk of celery, 4 parsley stems (with leaves removed), 1/2 bay leaf, and 2 thyme sprigs
    salt
    9 small white onions
    1 1/2 tbsp butter
    1 tbsp butter
    9 mushrooms
    3 tbsp heavy cream
    1 egg yolk

    1. In a dutch oven, place the veal and cover with water by 2 inches (you may want to season the veal with salt before this step). Simmer for 10 minutes. Pour the water and veal through a strainer. Rinse off the veal and clean out the dutch oven.
    2. Return the veal to the dutch oven and add the chicken stock to cover the veal by 1/2 inch. Bring the veal to a simmer. Skim any remaining scum from the surface. Once the scum has subsided, add the onion, carrot, and bouquet garni. Season the sauce lightly with salt. Cover with the lid slightly ajar and cook the veal at a simmer for 1 hour to 1 hour and 15 minutes.
    3. While the veal is cooking, cook the onions: Peel the onions and cut a cross in the root end. Place the onions, a 1/4 cup of the stock from the cooking veal, 1/2 tbsp of butter, and a pinch of salt in a sauce pan. Cover and lightly simmer for 50 minutes.
    4. When the veal is finished cooking, pour the contents through a strainer into a bowl. Return the veal to the dutch oven and discard the vegetables. In a sauce pan, over medium heat, melt 1 tbsp of butter and then whisk in 1 tbsp of flour. Cook for 1 minute. Off heat, whisk in the stock from the veal and any remaining liquid from the onions once they have finished. Simmer the mixture for 10 minutes.
    5. Sprinkle the mushrooms with a few drops of lemon juice. Add the mushrooms to the sauce mixture and simmer for another 10 minutes. Check the seasoning of the sauce.
    6. Pour the sauce into the dutch oven with the veal. Add 1 tbsp of cream. Place the dutch oven over medium heat.
    7. In a small bowl, combine the egg yolk with 2 tbsp of cream. Whisk in 1/4 cup of the hot sauce from the dutch oven then add the mixture back into the dutch oven.
    8. Simmer the mixture for a few minutes to warm the contents.

    Serves 2.

    My Grandmother’s Chicken Pot Pie

    Chicken Pot Pie

    My grandmother would frequently make this dish whenever we went over for dinner (I think it tended to be the days when it was just my dad and I for dinner; my dad isn’t really a culinary genius). At some point, my grandmother served this to my wife (I think it might have been before we were married) who proceeded to love it.

    The thing about this is that it’s not really a chicken pot pie. It’s definitely related but it’s closer to a chicken noodle soup. It’s chicken, noodles, potatoes, and a few vegetables in a small amount of broth. I don’t know how it got its name, but it was always simply referred to as chicken pot pie (to the best of my knowledge my grandmother never has made a traditional chicken pot pie). I also have no idea of the providence of this recipe beyond my grandmother.

    When I permanently moved away from home after college, I asked my grandmother to write down a recipe for her tomato sauce (partially for curiosity, mainly to placate her). She also wrote down the recipe for the chicken pot pie on the same piece of paper (if I remember correctly, it was because Angela liked it a lot).

    CRW_9563My grandmother is not entirely there any more (well, really ever) and it shows when you tried and read the recipe. At least for the tomato sauce, there were a number of things missing the first time I asked her about it that she added later on. It’s also written in very disjointed sentences.

    So, today, I got out my Sherlock Holmes hat (if only I really had one), and set out to decode the recipe. I’m not really sure how much the result really resembles my grandmother’s techniques and I doubt that the dish would be better following her techniques more closely (she has insisted for a number of years that there’s an oil sack in a leg of lamb that you have to make the butcher take out). If you haven’t figured it out by now, my grandmother is a bit crazy (and really always has been).

    CRW_9564As to the recipe itself, you basically cook the chicken in simmering water while making a stock. You then cook potatoes and noodles in the stock and add the cooked chicken back in. Not a particularly complicated process if you’ve made stock before (and really, even if you haven’t). Because I had some corn in the fridge that needed to be eaten (I bought it almost a week ago; I’m a master of buying vegetables and then not using them for a long period of time), I added that to the pot pie and I think it added some nice texture and flavor. The homemade noodles were where I fell flat. Now, I’ve made homemade pasta lots of times. I understand how to make pasta. Unfortunately, that doesn’t mean I know how to make noodles. The directions that my grandmother included were a little less than comprehensive. I’m not even sure what style of noodles these are (they have flour, shortening, and water in them). What really went wrong was that I simply undercooked them; they became a bit too rubbery and chewy.

    I’m a bit proud of myself as I had to guess and improvise quite a bit about how the dish goes together (not really my strong point; I tend to cook from recipes unless it’s particularly simple or I understand the dish well). I made the prefect amount of stock to go along with the chicken (I was afraid I’d have way too much but it was just perfect). I also guessed that the starch from the potatoes and noodles would thicken the broth up to the right point. The only part that didn’t come out as well as I would have liked (and I understand why) was the noodles (they were still good, just not quite perfect). It’s also nice to finally get to put up an original recipe up here (while it’s originally my grandmother’s, the recipe she gave me is more like a sign pointing me in the right direction).

    My Grandmother’s Chicken Pot Pie

    2 lbs chicken pieces, skin on and bone in (preferably chicken thighs)
    salt and pepper
    2 tbsp butter
    2 tbsp of sherry
    3 stalks of celery
    1 medium carrot
    1 medium onion
    a bouquet garni made up of 4 sprigs thyme, 2 sprigs Italian parsley, and a bay leaf
    3 cups of all purpose flour
    4 tbsp of shortening
    1 lbs potatoes
    2 cups of corn, preferably fresh (about 3 ears of corn)

    1. Dry the chicken pieces thoroughly. Season them on both sides with salt and pepper. Over medium-high heat, melt the butter in a skillet, then brown the chicken pieces on both sides, about 4 minutes per side.
    2. Pour the fat out of the skillet and discard. Off heat, deglaze the skillet with the sherry. Over high heat, boil the sherry for a minute, then turn off the heat and add 1 cup of water.
    3. Place the chicken in a dutch oven. Pour the contents of the skillet into the dutch oven then add cold water to cover the chicken completely. Bring the contents to a simmer over medium heat, do not allow to boil. Skim the surface of the stock until there is no remaining “scum” accumulating (while I’m sure there are better culinary definitions of “scum” on a stock, I remove anything that doesn’t look particularly appetizing).
    4. Cut the carrot and one stalk of celery into 3 inch long pieces. Peel the onion and quarter it. After the “scum” stops accumulating on the surface of the stock, add the carrot, celery, onion, and bouquet garni. Simmer slowly for one hour.
    5. While the stock is cooking, make the noodles. I made my noodles via the well method. You may be more comfortable mixing them in a bowl which should turn out fine (I made them this way because I make pasta via the well method). On a large flat surface (e.g. a cutting board, a sheet of parchment, a baking mat), place the flour. Make a well in the center and add the shortening and 2 tsp of salt. Cut the shortening into the flour. Once the shortening is incorporated into the flour (it won’t be completely incorporated but will be well distributed), make another well in the flour and add 3/4 of a cup of water. Mix the water with the flour. You may need to add up to another 1/4 cup of water to make the dough come together. Knead the dough briefly to make sure it’s come together. Roll out the noodle dough until it’s 1/4″ thick. Cut the dough into strips 1/2″ wide by 2″ long. Set the dough aside.
    6. Peel the potatoes and cut into bite size pieces. Cut the remaining two stalks of celery of celery into 1/8″ wide pieces. If using fresh corn, cut it off the cob.
    7. After one hour of simmering, remove the chicken, the vegetables and the bouquet garni from the stock. Retain the chicken and discard the vegetables and bouquet garni.
    8. Boil the stock for 10 minutes until slightly reduced. Return the stock to a simmer. Season the stock with salt and pepper to taste (really taste it; it needs salt and it’s hard for me to tell how much).
    9. Add the potatoes and celery to the stock and cook for 5 minutes.
    10. Add the noodles and corn and cook for another 5 minutes.
    11. Remove the skin and bone from the cooked chicken. Shred the chicken into bite sizes pieces. Season the chicken with salt and pepper to taste (it’s not raw now; you can taste it without getting sick!). Add the cooked chicken to the stock and cook for 5 more minutes.
    12. Remove from heat and check the seasoning.

    Serves 8 (this is really just a guess; there are only two of us and it made a large amount; I believe I know what I’m taking to work for lunch the rest of the week)

    Eggplant Parmesan

    Eggplant Parmesan

    I have a confession. I had never had eggplant parmesan (does parmesan need to be capitalized? my spell checker wants it to be; it’s the anglization of parmigiano meaning something from Parma, Italy) before. I love Italian food (I believe it’s authentically Italian as I’ve seen it in Italy and Wikipedia backs me up) as well as the Italian-American versions with chicken or better yet veal so you’d think that I’d have tried it before now.

    However, until very recently I was of the opinion that eggplant was ‘icky.’ A certain movie with an animated rat (which, by the way, I haven’t gotten around to seeing yet) made me decide that I needed to at least reevaluate my opinions of eggplant. At the time, I made a simple version of ratatouille and actually liked it (I spared Angela from even trying it as I was almost positive she’d give it a thumbs down).

    Risen Bread Dough

    When it comes to Italian food, I’m much more in my comfort zone and am much more likely to modify a recipe to suit my tastes (or what I think my tastes will be). I used Marcella Hazan’s recipe as a basis and it turned out to be different than I was expecting. For some reason, I expected there to be bread crumbs on the eggplant but this recipe did not call for them (although that would be an interesting variation to try in the future). It was also layered and I was expecting a single layer of eggplant. I suppose I was expecting chicken parmesan where eggplant has replaced chicken.

    As to the recipe, it was pretty good. I don’t think I soaked the eggplant in salt long enough as it was still quite bitter (unlike the afore mentioned ratatouille) and didn’t seem to have exuded a significant amount of liquid. I only had dry basil (the original recipe called for fresh but the basil plant I bought a few months ago is pretty much dead; I have a brown thumb) but it would probably be better replaced with fresh basil added as part of the layering stage. Because I used less eggplant, I ended up with fewer layers. Also, as you can tell in the picture above, the dish did not retain its structural integrity (wow, that brought out my inner engineer) when it was removed from the serving dish.

    And Angela hated it (but what do you expect, she hates vegetables).

    Eggplant Parmesan
    Adapted from Essentials of Classic Italian Cooking

    1 medium Italian eggplant (the type that vaguely resembles a purple banana)
    salt
    1/2 cup all purpose flour
    4 tbsp olive oil
    3 roma tomatoes
    1 tsp dry basil
    2 oz mozzarella cheese, thinly sliced
    1/4 cup grated parmesan cheese

    1. Preheat oven to 400°F.
    2. Cut the eggplant into 3/8″ thick slices (for my eggplant, it resulted in about 4 different slices). Place in a collander over the sink and sprinkle both sides generously with salt. Allow to sit for at least half an hour (if my experience is any guide, probably closer to an hour to remove more of the bitterness).
    3. Run the tomatoes through a food mill (if you don’t have one, buy one; or skin, seed, and dice the tomatoes). Add 1 tbsp of olive oil, the tomatoes, 1 tsp salt, and the basil to a sauce pan. Simmer until reduced to a thicker consistency.
    4. Dry the eggplant slices in paper towels. Dredge the eggplant in the flour.
    5. Heat 3 tbsp of olive oil in a skillet over medium-high heat until just before smoking. Add the eggplant, cooking in batches if needed, until browned on both sides. About 2 to 3 minutes per side.
    6. Grease a heat proof baking dish. Add a layer of eggplant, add a layer of mozzarella cheese, layer with tomato sauce, and sprinkle generously with parmesan cheese. Add another layer of eggplant, top with tomato sauce, and sprinkle with parmesan cheese.
    7. Bake for 20 minutes at 400°F.

    Serves 2.

    My Wife is Insane

    Angela is insane