Archive Page 13

Dungeness Crabs

CRW_9724

Because my birthday was on Sunday (yes, I’m now old), we decided to do something special for dinner on Saturday. We would’ve gone out to eat but, really, we had eaten out enough the previous week and we didn’t particularly feel like it. Instead, we decided to get something special to make for dinner.

Growing up, there’s always be at least one day in the summer when we’d get steamed crabs. Because I grew up in Maryland, these were always blue crabs seasoned with lots of Old Bay. I remember eating them at a young enough age that I really couldn’t pick the crabs myself so I had to have my parents do it for me. And, of course, they’re messy. And you never really get a lot of meat out of them. As my great-grandfather used to say, “You can eat crabs until you die of starvation.”

When I moved to the west coast I knew that blue crabs aren’t native here but something called Dungeness crab. I had seen cooked crabs at the grocery store in the past but they were always expensive and I knew that crabs are best if cooked live. I had heard about how good the Dungeness crabs were supposed to be but was never in a position to really try them (there seems to be a lack of good seafood in Long Beach for an area that is so close to the sea).

When we were in San Francisco, I did actually order half of a crab for lunch. It was served cold which seemed odd to me. It was good but it wasn’t particularly special. I thought I needed to give the crabs a fair chance.

Which brings us to Saturday, when we were in Eagle Rock. After lunch, we stopped at Seafood City (because who doesn’t enjoy wandering around a new ethnic supermarket?). I found that they were selling pork belly which I was looking for to make panchetta (it’s curing at the moment) and they also had an amazing seafood selection. While the fish looked excellent and I was tempted to buy some, I knew that Angela wasn’t a fan.

Instead, we decided that our special ingredient for the evening (and now I feel like the announcer on Iron Chef) would be Dungeness crabs. The fish counter attendant had to fish them out of a large tank and the crabs didn’t seem interested in leaving. And at least one other store employee came up to the crab catcher and jumped at her to startle her.

CRW_9696

With our crabs in the car, we rushed home to refrigerate the crabs on more ice. They had already started settling down from their initial level of activity (I wanted to label it frenetic but it could only be called frenetic in comparison to a snail).

They sat in the refrigerator for several hours until it came time for dinner. Now, I had never cooked crabs before (but I knew how it worked with blue crabs) so I had to check several different websites. I decided on steaming them for 15 minutes as it seemed less error prone then boiling (less ability for the crabs to get water logged as they aren’t in the water).

I do, however, think I made a mistake: I put a lid on the pot while steaming the crabs. It resulted in lots of bubbles forming which helped some water get in the crabs. But they weren’t overcooked.

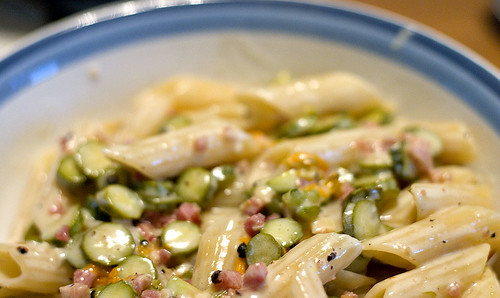
We served them with homemade bread (the recipe will be posted someday) and a California Chardonnay (only lightly oaked and not buttery). As for the taste, the claws were quite good. One crab lost a claw before cooking and it was less tasty than the one that got cooked still attached; empirical evidence that cooking live crabs is better. Neither of us found the body meat to be as good as the claw meat. This is the opposite to blue crabs where the claw meat is alright but the body meat is better. I did like them though.

CRW_9708

The Wife Speaks: Spitz in Eagle Rock

I do exist; Matt does actually have a wife who’s crazy enough to have her vegetable-hating ways publicized on his food blog. I hate cooking so it’s appropriate that my first post here is about a restaurant (insert joke about how the best thing I made is reservations). Prepare yourself for bad photos and even poorer writing.

spitz sign

Spitz is a döner kebab restaurant located in Eagle Rock, a small town near Downtown LA. Döner kebabs are sandwiches/wraps changed for German tastes, starting with a Turkish version of the Greek gyro. When Matt toured Europe a few summers ago, he’d been told to try döners by his cousin who spent many years in Germany; he enjoyed their thin strips of meatloaf-like substance and cheap price (usually less than three Euros).


Located right off the 5 North, Spitz is the result of two Occidental College students who decided they wanted to open a restaurant. We visited yesterday (Saturday) for lunch and found the place the perfect business level: not so slow that they went slow, not so busy you had to wait half an hour for food. We chose to sit at one of the ten or so tables situated outside the small place. Matt ordered the Classic Döner Kebab as a wrap with all the usual trimmings plus a side of sweet potato fries and a soda. I, being the resident veggie-hater, got mine as a sandwhich sans veggies with yogurt and hot sauce on the side (plus spiced fries). I brandished my crappy student ID for the ten-percent student discount.


spitz wrap spitz sandwhich

The food was excellent though somewhat pricier than the German version (okay, so we don’t have döner kebab shops on every corner here). We’d happily make the short trip North some other weekend.

Penne con Fiori di Zucchine (Penne with Zucchini Blossoms)

CRW_9685

Last weekend, we went to the Santa Monica Farmers’ Market, because the Long Beach Farmers’ Market was closed because of the marathon. While there, I found some zucchini blossoms which aren’t usually sold in Long Beach (we have options for which vendor to buy something from but there isn’t a whole lot of variety in types of produce). I spent most of the week trying to make something with them but we kept getting side tracked with other options for dinner (we, uh, mostly ate out this week).

I had never actually eaten zucchini blossoms before but they always looked good on television (I have a confession to make: I watch way too much of Molto Mario). So I had no idea if I’d like them or what the best way to prepare them was. So I just picked something that looked reasonably good. I also needed something where the pickier eater in the family would have something to eat (it bothers me when she makes instant macaroni & cheese or a microwavable pizza when I’m at home) no matter what.

CRW_9676

So I ended up making pasta because at worst we could eat the pasta. And the pasta was quite good. It was good enough that this dish would be good without the zucchini blossoms. Angela described it as being both light and heavy at the same time and I’d have to agree. It had body but it wasn’t overly heavy and filling. It was really just a nice pasta dish.

I did like the zucchini blossoms but the blossoms themselves seem to get lost in the sauce of this dish. I believe they add flavor but I’m not sure if this is the best use of the zucchini blossoms themselves (next time I find them I may try stuffing and frying them).

CRW_9682

Penne con Fiori di Zucchine (Penne with Zucchini Blossoms)
Adapted from Trattoria Cooking

6 small zucchini flowers with small zucchini attached
2 tbsp olive oil
1/2 tbsp unsalted butter
2 oz. panchetta, diced
1 garlic clove, diced
1/2 cup dry white wine
2 tbsp chicken broth
1/2 cup heavy cream
salt and black pepper
1/2 pound penne
1/4 cup parmesan cheese

  1. Separate the flowers from the zucchini. Remove the stamen (the part inside the flower) and any remaining stem from the flowers and zucchini. Rinse the flowers and zucchini under cold water and dry with paper towels. Cut the flowers into quarters lengthwise. Slice the zucchini thinly.
  2. Cook the pasta in boiling salted water for 1 minute less than specified by the directions.
  3. In a large sauce pan, melt the butter with the olive oil over medium-high heat. Add the panchetta and cook until browned, 2 to 3 minutes. Add the zucchini, flowers, and garlic and cook for 1 minute.
  4. Add the wine and stir, scrapping any brown bits, until the wine is almost completely reduced, about 3 minutes.
  5. Stir in the broth and the cream. Season with salt and pepper. Simmer until the sauce is thickened about 4 minutes.
  6. Add the cooked pasta and cook for one minute more, stirring regularly.
  7. Serve with parmesan cheese.

Serves 2.

Bon Appétit

I received a promotional offer from Bon Appétit in the mail the other day. It was offering a year’s subscription for $12. What confused me was that it was listed as a non-transferable special offer for “professionals.” Exactly what type of professionals is their target market? Is there really a dearth of engineers that read the magazine? Or is it enough that you call yourself a professional? I think I’ll be a professional elephant wrangler from now on (I’m waiting for the special offer from Elephant Wrangler’s Monthly).

And, yes, I subscribed.  I mean, it was only $12.  So maybe they should continue the promotion as it seems to be working.

Sea Urchin Chocolate Cookies

CRW_9673

David Lebovitz calls these Black & White Cookies. Now, I think he’s wrong. I’m pretty sure what’s pictured on Wikipedia is not what I made (and how could Wikipedia be anything but completely correct?). He also says that they could be called earthquake cookies or chocolate tremors (because apparently the cracks look like those caused by earthquakes). Again, I’m going to have to disagree.

What do these cookies really look like? Like a sea urchin. True, it may not be the most appetizing comparison ever (all I can think of is the original Iron Chef and their usage of sea urchin roe) but, hey, it’s what they look like.

It took me awhile to figure out what they really looked like to me. I started by thinking it looked like some kind of mineral but I couldn’t find an appropriate one (trust me, there are a lot of minerals out there). Then I thought maybe it looked like a sea sponge. And then I finally settled on sea urchin.

CRW_9664

I’m a bit restricted when I make desserts as I have a certain significant other who doesn’t like nuts (or so she claims). This means that I have to adapt the desserts to remove the nuts. For things like chocolate chip cookies, that means that I just leave them out. In this case, the original recipe called for them to be ground in a food processor which made it a bit more complicated. So I just added a little bit more flour and it seemed to work out.

According to the recipe (I doubled it), this should make 80 cookies. It made much closer to 50 (I believe it was exactly 52; I don’t count, I just lay them out in orderly rows). I’m not entirely sure how one would get 80 cookies out of this batter (I really don’t think the almonds made enough of a difference but who knows). I was confused enough by it that I actually measured the size of my pre-baked cookies to make sure that they were actually an inch in diameter. I think I may need more things to do with my time.

My final comment on the cookies is that the batter really really firms up when you refrigerate it. It was almost too firm to work with (the heat in my hands did help with that). I’d also recommend that you form the cookies in an assembly line fashion. Form all the cookies first, then coat them with each sugar. I’ve actually had to take training classes in Lean+ that tell you things such as that.

CRW_9668

Sea Urchin Chocolate Cookies
Adapted from Room for Dessert

1 lb bittersweet chocolate
6 tbsp butter
3 tbsp dark rum
4 eggs, at room temperature
2/3 cup granulated sugar, plus more for rolling cookies
1 1/4 cup all purpose flour
1 tsp baking powder
powdered sugar for rolling cookies

  1. In a double broiler, melt the chocolate, butter, and rum.
  2. Combine the eggs and granulated sugar in an electric mixer on medium speed fitted with the whisk attachment. Whisk for 5 to 7 minutes or until they form a ribbon.
  3. Switch to the paddle attachment and add the flour and baking powder. Mix on low speed to combine.
  4. Refrigerate the batter until it is firm, at least 1 hour and up to several days.
  5. Preheat the oven to 325°F.
  6. Take 1 1/2 tbsp of batter and roll it between your palms to form a ball. Repeat with the remaining batter.
  7. Place the granulated sugar in one bowl and the powdered sugar in another. Roll each ball in the granulated sugar and then in the powdered sugar. Place them on a baking sheet spaced about 1″.
  8. Bake for 12 to 14 minutes. Allow to cool slightly before removing from the baking sheet. Store in a airtight container.

Makes about 50 cookies.

Slow cooker “BBQ” Spareribs

CRW_9662

Who doesn’t love pork ribs? Well, I can definitely see those with OCD having a problem with it. But the mess is part of the fun.

Of course to make them for real you need to smoke them low and slow (or at least that’s the rumor). Unfortunately, despite our apartment complex having the name “Patio Gardens” we have neither a patio nor a garden (that’s what we get for living on the second floor), so I can’t actually smoke them over charcoal for hours and hours. That and I have to go to work on Mondays so it couldn’t have been dinner in that case.

Enter the slow cooker. Sure, it’s not real barbeque (hence the quotes in the title; they are not superfluous) but it’s as close as I’m going to get in the near future. And, frankly, it’s still good so who really cares?

CRW_9657

Slow cooker “BBQ” Spareribs

1/4 cup All Purpose Red Rub
1/2 rack pork spareribs (about 2 lbs)
1 tbsp canola oil
1 bottle barbeque sauce (preferably Dinosaur Bar-B-Que)

  1. Preferably one day before serving, trim any excess fat from the spareribs and cover them well with the red rub. Refrigerate until ready to cook.
  2. Remove the spareribs from the refrigerator and dry the outside with paper towels (some of the rub will come off). Heat a large skillet (preferably cast iron) over high heat with the canola oil until smoking. Brown the spareribs in the skillet, about 2 to 3 minutes per side (the rib side won’t brown particularly well because of the curvature of the ribs).
  3. Place the spareribs in the slow cooker and cover with barbeque sauce. Cook on low heat for at least 8 hours. Remove from the slow cooker and allow to rest for 15 minutes before serving.

Serves 2 to 3.

CRW_9655

All Purpose Red Rub
Adapted from Dinosaur Bar-B-Que: An American Roadhouse

1/2 cup paprika
1/2 cup kosher salt
1/2 cup light brown sugar
1/2 cup garlic powder
6 tbsp onion powder
1/4 cup chili powder
1 tbsp black pepper
1 tsp ground cumin
1/2 tsp cayenne pepper

  1. Combine all ingredients in a sealable plastic container and mix well.

Makes 2 3/4 cups.

Whoopie Pies

CRW_9654

Angela had planned to go to a yarn swap yesterday (I know as much about these as you do, trust me) and had apparently volunteered me to make some sort of edible goodie. This isn’t that big of a deal but it’s helpful when she, you know, has some idea of what she’d like me to make.

So I ran (well, slowly walked) to my cookbook shelf (scratch that, it fills up the entire bookcase now) and started to look through my collection. We started off with the idea that I’d make something savory (as apparently there’d be other sweet items) but that quickly fell by the wayside when we realized it’d be difficult to take something that was warm.

Eventually I thought of whoopie pies. I reached for the Mennonite Community Cookbook, certain that the recipe would be in its spiral bound interior. Alas, I was mistaken. Despite the fact that my mom used to make them growing up and that I’ve always associated them with Mennonites (and by extension Pennsylvania-Dutch), it was not to be found in one of the foremost Mennonite culinary tomes. I did have a recipe for pumpkin whoopie pies that my aunt sent me but the sugar pumpkin I have is reserved for pumpkin pie (both of which will be feature on here later).

So I resorted to the internet. And I ended up at Bella Online: The Voice of Women. Er, right. Voice of women. Okay. I’m just here for the recipe, thanks (this reminds me of the time I had to stop by Angela’s gynecologist to pick up a prescription for her; I’ve never gotten such looks of hatred in my life).

The recipe itself was pretty close to what I remember (Epicurious uses marshmallow fluff which is simply wrong). My only problem was that the cookie part didn’t puff up to the height I’m used to. They are, however, quite good. Do be aware that the filling has raw egg whites in it (sadly, I had to tell my pregnant cousin not to eat any). And scooping the batter onto the cookie sheets makes quite a mess.

And there would’ve been more pictures but individual whoopie pies look a bit sad (or at least the ones I make do).

Whoopie Pies
Adapted from Bella Online

Cookie Ingredients:
4 cups flour
2 tsp baking soda
1 cup dutch-process cocoa powder
pinch of salt
2 cups sugar
1 cup vegetable shortening
2 eggs
1 cup milk
1 cup warm water
2 tsp vanilla

Filling Ingredients:
2 tsp vanilla
4 tbsp flour
4 tbsp milk
4 cups powdered sugar
1 1/2 cups vegetable shortening
2 egg whites

  1. Preheat the oven to 375ºF.
  2. Sift together the flour, baking soda, cocoa powder, and salt.
  3. In an electric mixer, beat the sugar, vegetable shortening, and eggs for about 2 minutes on medium speed. Slowly add the flour mixture. Add the milk, water, and vanilla and mix for 3 minutes.
  4. On an ungreased, nonstick baking sheet, place tablespoon full drops of batter. The batter will be very liquid and spread easily. Leave ample room between the drops.
  5. Bake for 10 to 12 minutes. Remove from the baking sheet and allow to cool on a wire rack.
  6. Beat together all the filling ingredients except for the egg whites in an electric mixer on medium speed until well combined.
  7. Beat the egg whites until stiff peaks form.
  8. Fold the egg whites into the filling.
  9. Spread the filling on the bottom of a cooled cookie. Top with another cooled cookie. Wrap individually in plastic wrap.

Fried Chicken

CRW_9635

Every once in awhile I get a craving for fried chicken. And the sad thing is, until yesterday, I’ve been unable to make it and there’s a dearth of good fried chicken here (I have still yet to try Roscoe’s Chicken and Waffles). I’ve tried a number of recipes (including Cook’s Illustrated among others) and none of them satisfied (usually the batter didn’t come out correctly).

I mean, fried chicken has a look. Everyone knows what fried chicken looks like. And mine never did. It was either too pale or too dark. Or it had mostly fallen off the chicken. And it didn’t have a satisfactory taste to it.

CRW_9633

But that all changed last night. I finally had fried chicken success. I was finally a fried chicken master. The chicken was browned. It had the look. It was juicy all the way through (is it me or is one of the most disappointing things in the world dry fried chicken breasts?) Okay, it came out overly salty (I’m blaming that on my over optimistic reading of the line “brine for at least 4 hours or overnight”; when they say overnight, the Lee Brother’s apparently don’t mean 24 hours). But it was still good. Very good. And it was even better with their biscuits and creamed corn.

CRW_9637

Fried Chicken
Adapted from The Lee Bros. Southern Cookbook: Stories and Recipes for Southerners and Would-be Southerners

3 chicken thighs, bone-in and skin-on
3 chicken legs, bone-in and skin-on
3 cups peanut or canola oil

Brine:
2 cups water
1/4 cup kosher salt

Dredging Mixture:
1/2 cup all purpose flour
3 tbsp cornmeal
2 tsp kosher salt
1 1/2 tsp black pepper

  1. In a medium bowl (one that holds about 2 to 3 quarts; mine is actually my “small” bowl), stir together the brine ingredients until the salt is dissolved. Trim any excess fat from the chicken thighs and legs (on mine, there was a large layer of fat on the underside of the chicken thighs) and then add them to the brine. Cover the bowl and place in the refrigerator. Brine for 4 hours and up to overnight (which is what the recipe said; I brined over night and the chicken was too salty; in this case, overnight should mean no more than 8 hours or so). Remove the chicken from the refrigerator at least two hours before cooking so that it can come up to room temperature.
  2. In shallow dish mix the dredging mixture together (I actually have a set of plastic dishes that are designed for breading food). Dredge each piece of chicken through the dredging mixture, until coated thoroughly. Shake off any excess.
  3. In a large skillet (preferably cast iron and you need it to hold all the chicken), add enough oil to coat the bottom by 1/3″. Heat the oil over high heat until it reaches 325ºF. Add the chicken skin side up, cover the pan, and cook for 6 minutes. Turn the chicken, cover the pan, and cook for another 6 minutes. During the cooking process attempt to maintain the heat between 325ºF and 350ºF.
  4. Remove the chicken to a paper towel covered plate.

Serves 2 to 3 (we had leftovers which are my lunch today).

Bacon and Egg Fried Rice

CRW_9631

This dish is better than anything your making. No really, it is. For the simple reason that it has bacon in it. Is there a more perfect food than bacon? If the ancient Greeks had bacon, bacon would’ve been served instead of ambrosia on Mount Olympus; Plato would’ve contemplated the Form of Bacon instead of the Form of Beauty; statues of bacon would’ve been made instead of athletes. Is there something that bacon doesn’t make better?

Well, I’m pretty sure there is (I can’t imagine bacon works particularly well in sweet foods). So, enough bacon hyperbole. It’s not the solution to the world’s problems. But it is quite good.

We actually get a pretty good bacon from our local butcher shop (I appreciate buying bacon in small quantities because, while it’s good, I don’t use it all that often). I have no idea where they buy it from but otherwise the Niman Ranch bacon sold at Trader Joe’s quite good (and don’t get me started on their ham).

The first time I made this dish it instantly became comfort food for me. I don’t know how or why, but there it is. There’s some quality to it that brings me solace. I’m betting it’s the bacon.

This dish comes from Gourmet originally. Their version is available on Epicurious. The recipe is pretty quick (it takes slightly longer than it takes the rice to cook) and pretty easy. It also makes wonderful leftovers (I actually made this on Tuesday night and have been eating the rest of at lunch and telling my coworkers “My lunch is better than yours because it has bacon”). Sadly, we didn’t have any scallions so I had to leave them out (there’s a slight taste difference and, more noticeably, the colors different).

While I haven’t done it, this dish seems like it would be tailor made for some modifications. Replace the bacon with ham maybe. Or even sausage. But why would you want to do that? Maybe there’s a worldwide bacon shortage; I need to remember to buy pork belly futures then.

CRW_9628

Bacon and Egg Fried Rice
Adapted from Gourmet, May 2007

2 cups long-grained rice
2 1/2 cups of water
8 slices of bacon, cut into 1/2″ strips
6 eggs
1 1/2 tsp salt
1/2 tsp black pepper
1 medium onion, chopped
1 tbsp vegetable oil
1/2 cup chopped scallions
1 tsp sesame oil

  1. Bring the water to a boil in a sauce pan over high heat. Add the rice, cover, reduce the heat to low and cook for 20 minutes.
  2. In a bowl, whisk together the eggs, 1/2 tsp salt, and 1/4 tsp pepper.
  3. In a large (no, not that one, the bigger one; you’ll need it) non-stick skillet, cook the bacon over medium heat until crisp, about 6 minutes. Pour the bacon into a bowl through a strainer. Reserve both.
  4. Return 3 tbsp bacon fat to the skillet, turn heat to medium, and add the onions. Cook until softened about 5 minutes. Add the eggs and cook, stirring constantly, until just about set, about 1 minute.
  5. Make a well in the center, and add 2 tbsp bacon fat and the vegetable oil. Add the rice, remaining salt (1 tsp), and remaining pepper (1/4 tsp) and cook while stirring about 2 minutes.
  6. Add the bacon, scallions, and sesame oil, stir, and cook for 1 minute to heat thoroughly.

Serves 6.

Tomato and Roasted Garlic Soup

CRW_9623

I work in a building that is, at times, fairly well air conditioned (read: cold). It’s also significantly closer to the beach then where I live (which means it’s cooler). So, on Monday, I was feeling a cold at work (I swear I walked between buildings and also was cold but it could’ve been that it’s heavily in shadows) and was trying to figure out what to make for dinner (the refrigerator is mostly bare and we had some tomatoes left over from last week). In early afternoon, I called Angela and said that it was a bit cooler and would she mind having tomato bisque for dinner.

Turns out, when I got home that there were two complications: it was most definitely not cold (it wasn’t quite hot but it was definitely not on the cold side of the scale) and Angela thought I meant this soup (not that I really had any particular recipe in mind). Well, when she-who-must-be-obeyed tells me that she expects one thing for dinner, if I’m smart (like that’ll happen regularly), I make what she wants. And so I did.

This recipe actually comes from one of my favorite cookbooks from one of my favorite restaurants. I went to college (er, technically I went to “institute”) in Rochester, NY and the area right around the school was a chain-restaurant wasteland. Every once in awhile, we’d consider it special enough (or when parents visited and were willing to pay), we’d venture downtown and go to Dinosaur BBQ. Now, not being from the south (Maryland never seceded y’all), I have no idea how this compares to the “real thing” (Angela, while being from Florida, is really from “Southern Long Island”). I consider it to be very good and that’s good enough for me (I’m getting hungry just thinking about the pulled pork; I may make my bastardized crock pot version this weekend).

Right before I graduated from college, I realized there were several things I would miss from Rochester (outside of the people). Towards the top of the list was Dinosaur BBQ, so while shopping at a bookstore I noticed they had a cookbook and I bought it. Now, I don’t have a backyard and, hence, no grill or other way to smoke meat but surprisingly, there are plenty of recipes for indoors (or that can be adapted for indoors use, such as the above mentioned pulled pork). Also, uniquely among barbeque restaurants (or so I’ve heard), they gave away their recipe for their sauce (of course, I’ve not made it from scratch; some grocery stores sell it and it’s indistinguishable from the original).

The thing that’s amazed me about the cookbook is that the recipes work. They’re clearly written and they work well. Outside of Julia Child, there are very few recipes that have worked as well for me as the ones in this cookbook. So I highly recommend you buy it if assuming (and this is a pretty easy assumption to make) you don’t own it.

And there are no pictures of the soup because they were pretty unattractive.

CRW_9620

Tomato and Roasted Garlic Soup
Adapted from Dinosaur Bar-B-Que: An American Roadhouse

1/4 cup butter
3 tbsp olive oil
1 1/4 cup chopped onion
salt and black pepper
1 1/2 tbsp minced garlic
2 tbsp flour
4 cups chicken stock
1 large garlic bulb or 2 small garlic bulbs
2 lbs. fresh tomatoes or 1 28 oz. can of tomatoes
1 bay leaf
1 cup heavy cream
1/2 cup grated parmesan cheese
Tabasco sauce
2 tbsp lemon juice
1 tsp thyme, chopped

  1. Preheat the oven to 375°F. Cut the tops off the bulbs of garlic, exposing the tops of the individual garlic cloves. Sprinkle with salt and pepper and drizzle with olive oil. Wrap the garlic bulbs in aluminum foil and roast in the oven for 45 to 60 minutes or until they are softened. When the garlic bulbs are finished cooking, squeeze out the garlic into a bowl and then, using a fork, make a paste of the garlic.
  2. Prepare the tomatoes by either running them through a food mill fitted with a disk with large wholes or, skin them, dice them, and crush them with a potato masher.
  3. In a soup pot, melt 2 tbsp of butter and 2 tbsp of olive oil over medium-high heat. Add the onion and add a pinch of salt and pepper. Cook until softened. Add the minced garlic and cook for 1 more minute.
  4. Whisk in the flour and cook for 1 minute. Then, whisk in the chicken stock.
  5. Add the roasted garlic, the tomatoes, and the bay leaf. Bring to a boil, cover, reduce heat to low, and simmer for 15 minutes.
  6. Uncover and add the heavy cream, the parmesan cheese, thyme, and lemon juice. Season generously with Tabasco sauce.
  7. Remove from heat. Puree the soup either with an immersion blender or, in batches, in a food processor or blender. If you’d rather have a chunky soup, skip this step (I like it mostly pureed with some chunks in there).
  8. Return soup to medium-high heat and cook until thickened to your desired consistency (how thick do you like your soup?). Taste for seasoning.

Serves 6 to 8.